|
|
Post by MsBig on Mar 27, 2006 5:31:57 GMT -5
|
|
|
|
Post by MsBig on Sept 6, 2006 4:15:55 GMT -5
Tip - Making FoldsIt's always tempting to just dent the sculpey to show folds. If you do this cleverly, it can work, especially when there are lots of them. The key thing to remember is that folds go out, not in, so the dents have to be wider than the raised parts. The best way to see if you are doing it right is to have a reference photo in front of you and try to match the photo exactly. The slower and more professional way to do it is to sculpt the shirt, for instance, competely smooth. Boil it to set. Then make some thin rolls of sculpey and place them strategically on the skirt, blending in the edges. Then boil again. I used this method on my recent Matteo custom. I made 2 shallow/wide dents in a smooth shirt and boiled. Then added and blended several rolls of sculpey as folds. 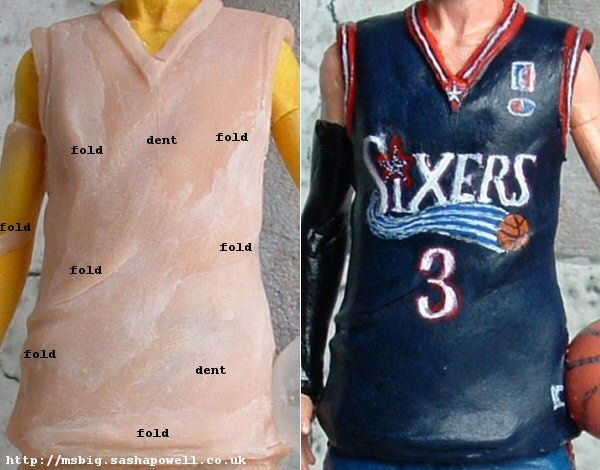
|
|
|
|
Post by MsBig on Jun 18, 2010 4:56:13 GMT -5
General Tips on Sculpting with Super Sculpey• I use Super Sculpey clay. I sculpt in stages and boil in a pan on the hob for 3 minutes to set each stage. This is so that I don’t mess up what I’ve already sculpted when trying to do the next stage. I tend to work from the feet up. • Find the right tools. I use items called “colour shapers” from a craft shop. I believe they are for pushing paint around but I find them excellent for shaping clay. Choose the medium or hard ones. Soft are no good. I use one pointed one and one wedge-shaped tool. I also use a scalpel for cutting straight edges. When the clay is set , I use metal files to sand it down gently. I keep the finished figure dust-free with a clean, dry lady’s blusher brush. 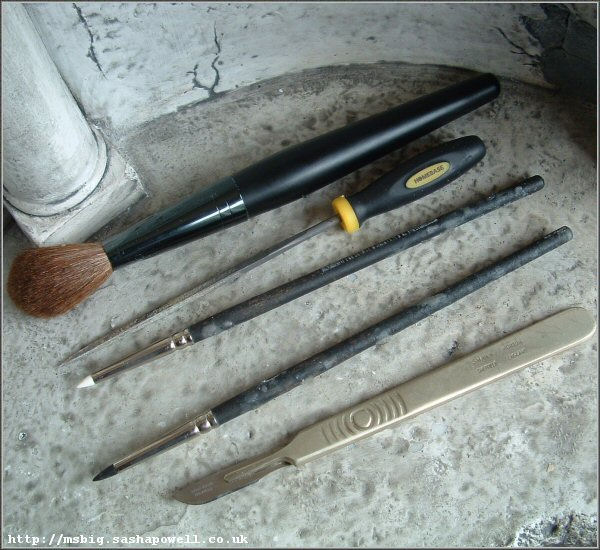 • Always use a printed out reference photo to guide you. It’s very hard to imagine how clothing hangs and where the folds are, if you can’t see then in a realistic setting. 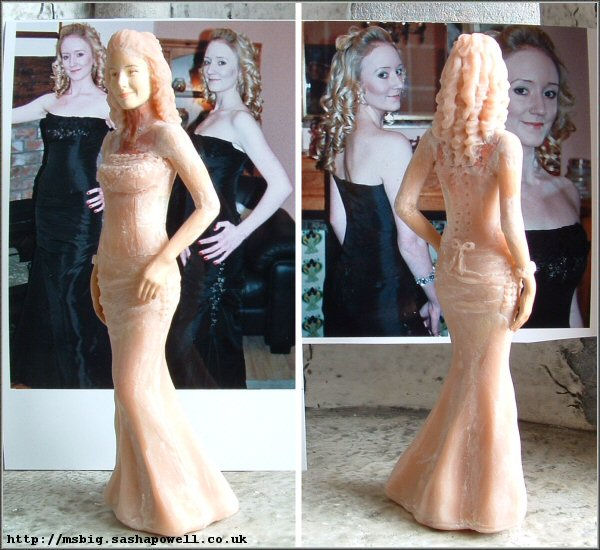 • Remember, folds on clothing go out, not in. Making dents instead of ridges is a common mistake. If you make the dents wider than the ridges, and you are consistent in their placement, you can do it that way for speed. If you have time, the most realistic way is to sculpt the slimmest version of the clothing, then add a few ridges where folds might occur. Smooth the edges with a sculpting tool. • I know it’s a bit gross but I use the spit and smooth method with sculpey. A damp finger is the best smoothing tool on soft sculpey. For a more hygienic approach, I suggest having a damp sponge nearby. Too much wet is no good. It should be like one of those stamp-wetting sponges at the post office. • When you’ve got a base figure that was factory painted, and you’re adding pink sculpey, it’s sometimes hard to see the shape of what you’re sculpting. When I think I’ve got the shape right, I hold the figure up to a window to see it in silhouette. This way, you can see flaws in the proportions and any rough edges.
|
|
|
|
Post by MsBig on Jun 18, 2010 4:56:50 GMT -5
Tips to Avoid Sculpey Cracking
Cracking is caused by extreme changes in temperature or pressure on a moveable joint beneath the clay.
• I would advise you not to use sculpey on a figure that you wish to keep articulated. At least, not on the parts that are close to a moveable joint.
• If sculpting over an articulated figure to make a statue, before applying the clay, put the figure in the correct position then superglue inside all the joins. This means that the plastic parts are completely unable to shift when heating up or cooling down. Shifting plastic parts can crack the clay. I use superglue that comes with a flat brush, ideal for slipping into the articulated joints.
• When you have boiled the figure to harden the clay, remove it from the hot water and let it cool down gently at room temperature. Cooling too fast can crack the clay. For instance, do not leave it to cool near an open window, or plunge it into cold water.
• Don't try to sculpt a very thick piece all in one go. This is more likely to crack. When I'm doing something like a ball gown, I sculpt the basic thick shape. I then boil the figure and let it cool. It does sometimes crack. I then use sculpey to fill in the cracks, and sculpt the final 1mm layer. This top layer rarely cracks.
• Avoid leaving any hollow parts that can create air pockets beneath the clay. The air has to escape somewhere and will crack the sculpey to escape the boiling water.
• If you are sending the finished item to a buyer abroad, wrap it in plenty of bubble-wrap to keep it snug in the cold hold of an aircraft.
|
|
|
|
Post by MsBig on Jun 18, 2010 4:58:44 GMT -5
Building Arms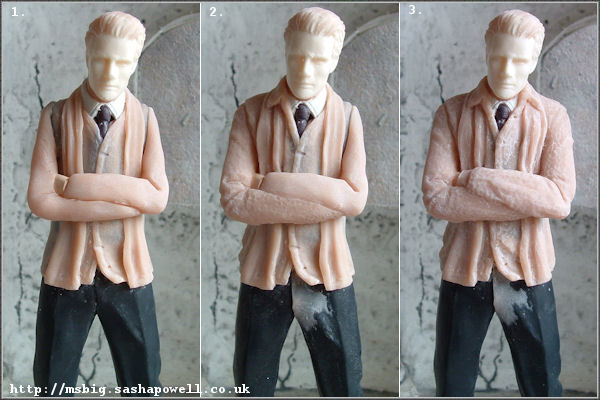 These arms were done from scratch. Remember that the top of the hand reaches to about groin level. And the elbow to roughly waist level. 1. Roll out 3mm thick sausages of sculpey, attach at the shoulder and let it dangle to gauge length. Then chop at groin level. Fold gently at half way point and put into “folded arms” position. Push some hands into position in the soft sculpey. Boil for 3 minutes to set. 2. When cool, sculpt the detail on one arm. The solid base gives you something to push against. Add clay to give a realistic arm shape. Look at it from all angles. Roll out a few very thin rolls of clay and place them on the arms where fold will occur. This guy was wearing a woolly cardigan, so I used the rounded back of the colour shaper to make very slight dents all over. Boil to set. 3. Repeat for second arm. Plus added a few fold rolls and texture dents on the front of the cardigan. 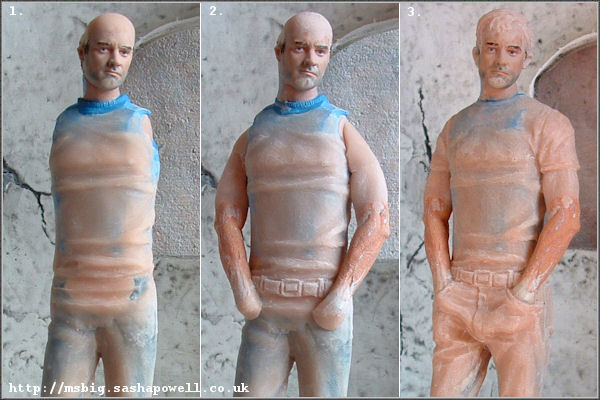 For these arms I used a partial arm, then build up around the shoulders and hands. 1. I sculpted the correct torso shape and a very basic hip shape, slimmer than needed. 2. I sculpted the belt, then glued on the partial arms, making sure the elbows came to the waist. 3. I sculpted the shoulders and t-shirt sleeves. Be sure to look carefully at your reference photo to see the breadth of the shoulder and the angle of the slope. I sculpted the pockets of the jeans and added folds to show the material bunching around the groin. Links to Helpful Info on my WebsiteThese pages on my website show my “How To” guide and examples of larger projects with lots of in-progress photos. www.sashacustoms.co.uk/home/about/how-to
|
|
|
|
Post by MsBig on Jun 18, 2010 5:23:51 GMT -5
Painting Denim Effect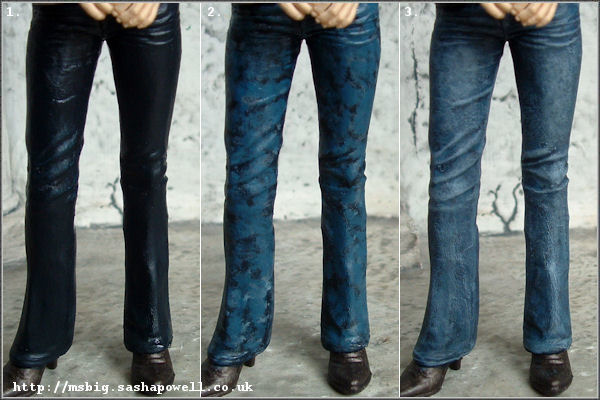 1. Look at the reference photo of the jeans you want to paint. Pick the darkest colour you can see underneath and paint the jeans solidly in that colour. I used a mix of black, ultramarine and turquoise. 2. You don't have to wait for the first coat to dry. Mix a grey colour with a touch of the original colour you used. Dab it in splodges all over the jeans. Then mix a more turquoise-y colour (using the original colour with extra turquoise and white) and do another layer of splodges all over. This gives some colour variation to the material. 3. Wait for the legs to dry completely. Then mix the palest colour that you can see on the jeans from your reference photo. Use a different clean/dry brush. Scrub it on some newspaper to remove excess paint. Then dry-brush it all over the jeans. This is called scumbling. If the final effect isn't light enough, add more white to the mixture and scumble again. When you've done scumbling, you can get more detail with a little wash. Mix the light colour with lots of water, take a small brush and run it round all the seams of the jeans, and splodge areas like tops of thighs and knees, where the denim is most worn.
|
|
|
|
Post by MsBig on Sept 29, 2015 14:01:02 GMT -5
Example Sculpting Hair
As the old topic photos no longer work, I've added a new one for sculpting hair.
Reference
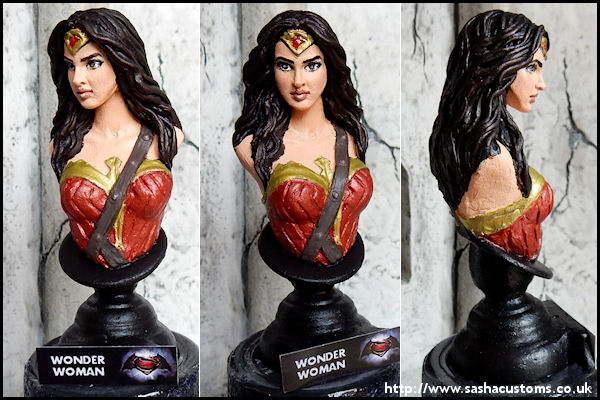
Gal Gadot as Wonder Woman - reference photos used

For the parts, I used a Divergent Tris head and a generic bust. Thanks to NECA Toys for the parts! I took photos of the various stages in sculpting. I've used this as a tutorial for sculpting wavy hair.
Stages 1-4 - Sculpting the Outfit

1. I removed the hair from the Tris head and shaved the tip of her nose and jawline with a scalpel. I sculpted more definition to her brow line and a fuller lower lip. I sculpted the headband, and then boiled the head to set the sculpey. I sculpted a smoother throat, shoulders, and collar bones. I attached the head to the neck with a metal pin and glue. I then boiled again to set.
2. I sculpted the basic bodice shape and scored a ribbed effect as a pattern, and then boiled to set.
3. I sculpted the bird-shaped edge to the bodice, and boiled again to set.
4. I sculpted the belt, and then boiled to set.
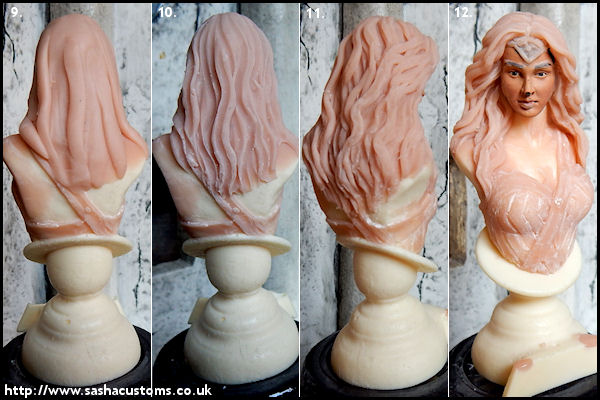
Stages 5-8 - Sculpting the Wavy Hair: Front View
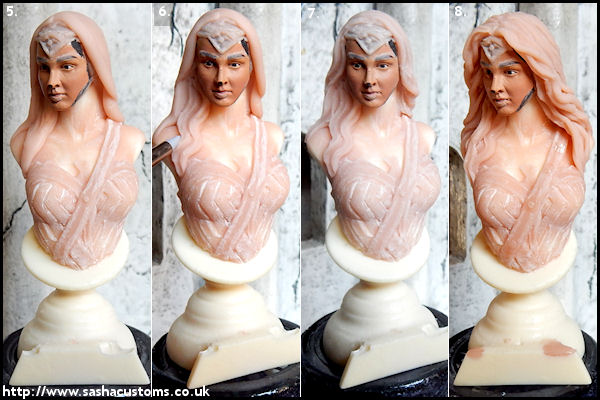
5. I placed super sculpey clay in a basic shape for her hair (see #9 for back view).
6. I used a colour shaper (the rubber pointy tool shown in the photo) to shape the wavy strands into the basic shape. Deeper scores to shape each lock and a shallow score within the lock.
7. I sculpted all the locks of hair within the basic shape (see #10 for back view), and then boiled to set.
8. Once the basic hair shape was boiled hard, I used it a structure for the rest of the hair. I rolled out slim sausages of sculpey as the locks of hair and attached them one by one. I placed each one in a wavy shape, and then gently scored a line down the middle of it. Then applied the next one, building up around 20 locks of hair until it looked like the same size and shape as the reference photo (see #11 and #12 for back and side views).
Stages 9-12 - Sculpting the Wavy Hair: Back View
The Finished 3" Mini-Bust
I then painted the bust using acrylic paint and gold paint-pen, and sprayed it with matt sealant. I printed the name and logo and attached it with glue. I used a blob of clear nail varnish to make the red jewel in her headband shine.
|
|