Post by Alyrenee on Jul 23, 2006 23:21:14 GMT -5
Here is a step by step view of my painting of As You Were Buffy...
Things to have:
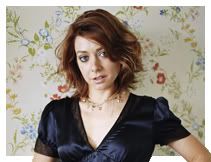
-Color picture of subject (absolutely crucial)...you should reference it often...
-acrylic paints: flesh, burnt sienna, yellow ocher, raw sienna or dark brown, pale mossy green, white, black, crimson
-tiny really nice brushes (I use Windsor and Newton brushes)
-color extender for acrylics (helps the paint flow and keeps things from drying too quickly...you add a few drops to your water)
-matte varnish
-satin varnish
-gloss varnish
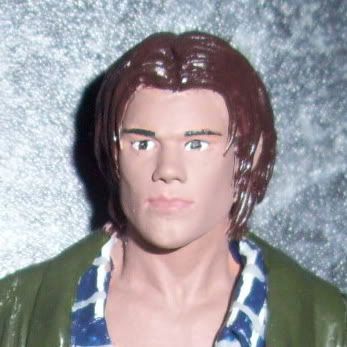
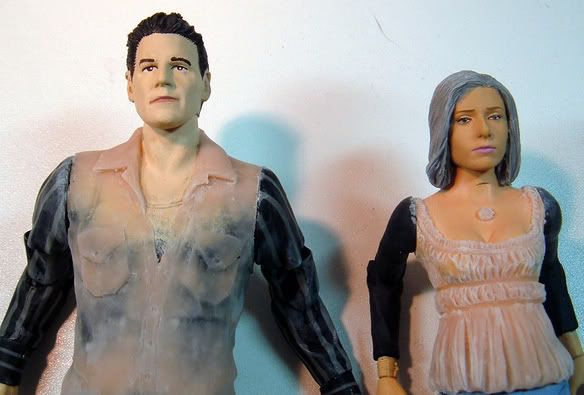
Here she is straight from the boiling water.... (along with an Angel)
Then I base her with standard "flesh" color.

Then I use "flesh" mixed with "burnt sienna" and water it down a bit and then use that to shade area on the face that recede in space...like the sides of the nose, under the lips, hollows of the cheek, cleavage, collar bone, sides of forehead, and crease of the eyes, also under the eyes, and the crease of the lip. This helps give the face DEPTH. Mac figure used to have some of this...DST figs usually do not. After I have added the lowlight/shadows to the face..i go back in with the straight flesh tone and add highlights to the face. Areas to be highlighted are the center of the forehead, down the nose, under the eyebrow, center of eyelid, area on cheeks just below eyes and along ton of cheek bone, fulcrum under nose and laugh lines, center of chin, top of collar bones, and breast mounds. I also give her hair a brown coat to be the undertone of the hair color.
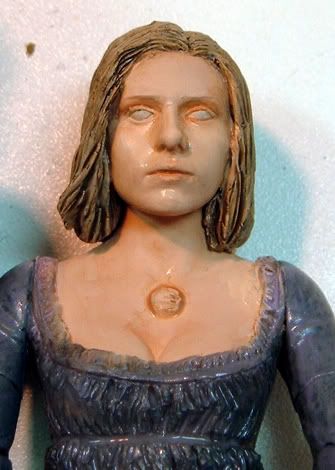
I then add white to the eyes and go in with further detail of burnt sienna to add depth. I also water down some "crimson red" to add blush to the cheek area. I add some lighter blond highlights to the hair by mixing yellow, brown, a little flesh, and white and then dry brushing it onto the hair. I go in again with a slightly lighter blond to accent it further. Once again..layers and variation of color add depth and therfore...make things look more lifelike.

I then take the crimson and do the lip area.

Now for the hard part..the eyes. First I start with brown and edge around the eyes to define the eye. I then go in with some black mixed with brown along the top to give more of an eyeliner/mascara effect. Do this with your super tiny brush. This should be very thin and smooth. Practice on your palette first before hitting the face. If you screw up...clean your brush and lift it back up with some water. Allow the area to dry before you start again. I go around the iris itself with a tiny thin line of dark brown to define it. If it gets messy you can cleanup the edges with a little white. Then I define the crease of the eye with some brown/black and add a pupil in black. I also paint the brows by first defining the area with a thin wash of brown. When i get the brow shape I want, I go over it to make it the right color. Brow color does not always match the hair color. In season 7, Buffy's brows are much lighter than her hair in some episodes. So check your reference pictures to get them right! You can also go back in with flesh color and clean things up..like sharpening up the lip line to get the shape right...

What is even harder is getting both eyes to match! I usually do them at the same time. But remember..people aren't symmetrical. Eyebrows can be lower or higher or there could be a scar like Spike or Piper on Charmed. Making these little details apparent are what will help you nail a likeness. I also added a slight highlight in a pinky shade to the lips to give them a LUSCIOUS effect. You should also add some dark brown or even a little black to the crease where the lips meet.

Once I get both eyes to my liking..the last thing to do is add a tiny white highlight near the pupil. This will give your eyes some life.


Once all that is finished, you should seal your figure in several thing layers of matte varnish. I then go in and add gloss to the eyeball area and sometimes to the lips to give a lip gloss effect. I usually put a layer of satin varnish on the hair to give it a silky hair look. That also works nice with some fabrics like leather...to give it a different texture.
Okay..hope this helps and I will try to get a better closeup of the finished face for you soon!
Things to have:
-Color picture of subject (absolutely crucial)...you should reference it often...
-acrylic paints: flesh, burnt sienna, yellow ocher, raw sienna or dark brown, pale mossy green, white, black, crimson
-tiny really nice brushes (I use Windsor and Newton brushes)
-color extender for acrylics (helps the paint flow and keeps things from drying too quickly...you add a few drops to your water)
-matte varnish
-satin varnish
-gloss varnish
Here she is straight from the boiling water.... (along with an Angel)
Then I base her with standard "flesh" color.
Then I use "flesh" mixed with "burnt sienna" and water it down a bit and then use that to shade area on the face that recede in space...like the sides of the nose, under the lips, hollows of the cheek, cleavage, collar bone, sides of forehead, and crease of the eyes, also under the eyes, and the crease of the lip. This helps give the face DEPTH. Mac figure used to have some of this...DST figs usually do not. After I have added the lowlight/shadows to the face..i go back in with the straight flesh tone and add highlights to the face. Areas to be highlighted are the center of the forehead, down the nose, under the eyebrow, center of eyelid, area on cheeks just below eyes and along ton of cheek bone, fulcrum under nose and laugh lines, center of chin, top of collar bones, and breast mounds. I also give her hair a brown coat to be the undertone of the hair color.
I then add white to the eyes and go in with further detail of burnt sienna to add depth. I also water down some "crimson red" to add blush to the cheek area. I add some lighter blond highlights to the hair by mixing yellow, brown, a little flesh, and white and then dry brushing it onto the hair. I go in again with a slightly lighter blond to accent it further. Once again..layers and variation of color add depth and therfore...make things look more lifelike.
I then take the crimson and do the lip area.
Now for the hard part..the eyes. First I start with brown and edge around the eyes to define the eye. I then go in with some black mixed with brown along the top to give more of an eyeliner/mascara effect. Do this with your super tiny brush. This should be very thin and smooth. Practice on your palette first before hitting the face. If you screw up...clean your brush and lift it back up with some water. Allow the area to dry before you start again. I go around the iris itself with a tiny thin line of dark brown to define it. If it gets messy you can cleanup the edges with a little white. Then I define the crease of the eye with some brown/black and add a pupil in black. I also paint the brows by first defining the area with a thin wash of brown. When i get the brow shape I want, I go over it to make it the right color. Brow color does not always match the hair color. In season 7, Buffy's brows are much lighter than her hair in some episodes. So check your reference pictures to get them right! You can also go back in with flesh color and clean things up..like sharpening up the lip line to get the shape right...
What is even harder is getting both eyes to match! I usually do them at the same time. But remember..people aren't symmetrical. Eyebrows can be lower or higher or there could be a scar like Spike or Piper on Charmed. Making these little details apparent are what will help you nail a likeness. I also added a slight highlight in a pinky shade to the lips to give them a LUSCIOUS effect. You should also add some dark brown or even a little black to the crease where the lips meet.
Once I get both eyes to my liking..the last thing to do is add a tiny white highlight near the pupil. This will give your eyes some life.
Once all that is finished, you should seal your figure in several thing layers of matte varnish. I then go in and add gloss to the eyeball area and sometimes to the lips to give a lip gloss effect. I usually put a layer of satin varnish on the hair to give it a silky hair look. That also works nice with some fabrics like leather...to give it a different texture.
Okay..hope this helps and I will try to get a better closeup of the finished face for you soon!


 I've been doing my repaints a totally different way, so this is very cool!