|
|
Post by willowswarlok on Feb 20, 2013 5:07:59 GMT -5
Very cool! Glad to see my statue inspired you  the new details make so much difference, they give her some great depth Nice sculpting on the blouse |
|
|
|
Post by willowswarlok on Feb 14, 2013 19:20:54 GMT -5
As you can see the nose is too large/big and the eyebrows should be differents to look better like sarah's ones Again, despite that, it's a really great custom Thanks for the feedback but im sorry i totally disagree I havent modified anything from the original sculpt of the Sideshow Premium Format. Thats the real head, nothing has changed. I can barely see any differences in the comparison photos you posted other than the eyebrows. Sorry you dont think it looks like Sarah. Im very pleased with the finished thing, as is the buyer. Thanks for the feedback though. |
|
|
|
Post by willowswarlok on Feb 14, 2013 15:38:09 GMT -5
Wow, thanks for the amazing feedback everyone. Im speechless at the response! I should have left this as my Swan Song huh? lol It actually would of been if i still didnt have so many ideas for Premium Formats! its addictive and Im really enjoying the challenge of changing their pose to make them all unique pieces. This one was by far the most difficult but its really paid off and im thrilled! The face was just me taking my time. I didnt use any reference, i just painted what i felt fit and it worked. i used less black on the bottom which i think has opened the eyes up I forgot to upload this pic, but i love this angle Wayne  |
|
|
|
Post by willowswarlok on Feb 12, 2013 17:31:41 GMT -5
Wayne, she is quite simply the most beautiful Buffy figure/statue/custom I have ever seen. I am so very jealous of ba1!! Thanks for the feedback everyone I really did try to make this special since i kept BA1 waiting so long! Heres a photo of her shirt detail painted Wayne 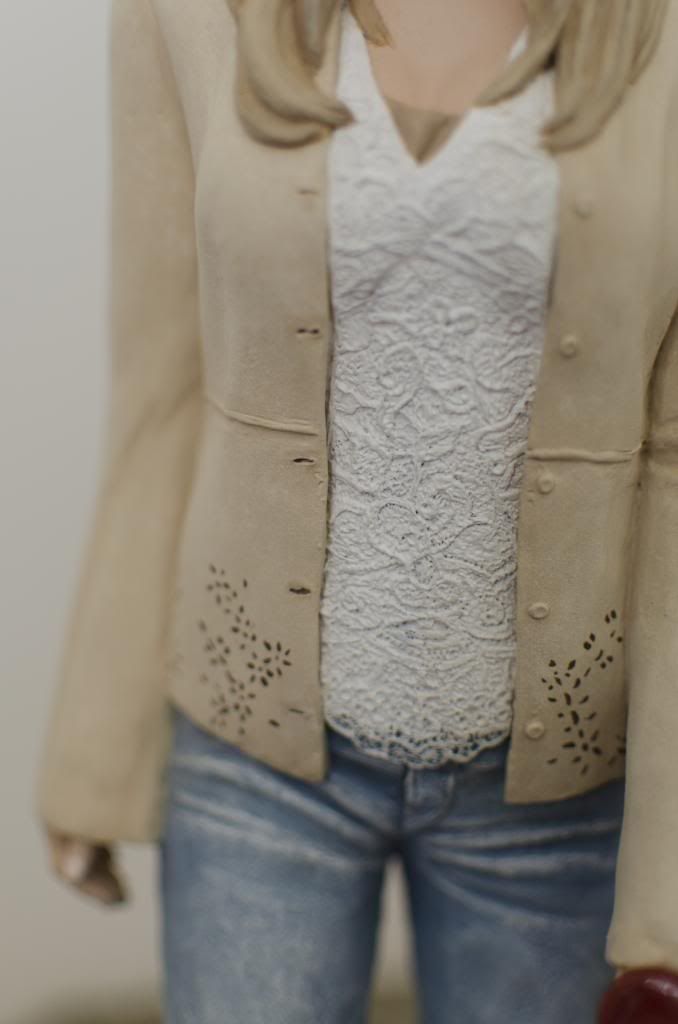 |
|
|
|
Post by willowswarlok on Feb 12, 2013 16:49:53 GMT -5
Thanks for the comments everyone im very pleased with her Roadie- her eyes are green with a brown rim. The camera probably isnt picking them up well |
|
|
|
Post by willowswarlok on Feb 12, 2013 15:40:28 GMT -5
Wow thanks for the votes everyone and congratulations to all the other winners. There was some great work!! |
|
|
|
Post by willowswarlok on Feb 12, 2013 15:06:20 GMT -5
Hey Ya'll Sorry ive not updated this in a while. Ive been taking photos but just not got around to posting them. Anyhoo, straight in. First off lets do the base. I used a round piece of wood, cut the back off to be flat, so it would fit BA1 specified space. I then 'sculpted' the walls with foam, then covered in Resin. I cut holes into the base which will hold lights. The lights were made from modified LED lights which have a remote control to turn them on and off. I modified the switch so it was on top not underneath so it wouldnt be difficult to permenantly switch off 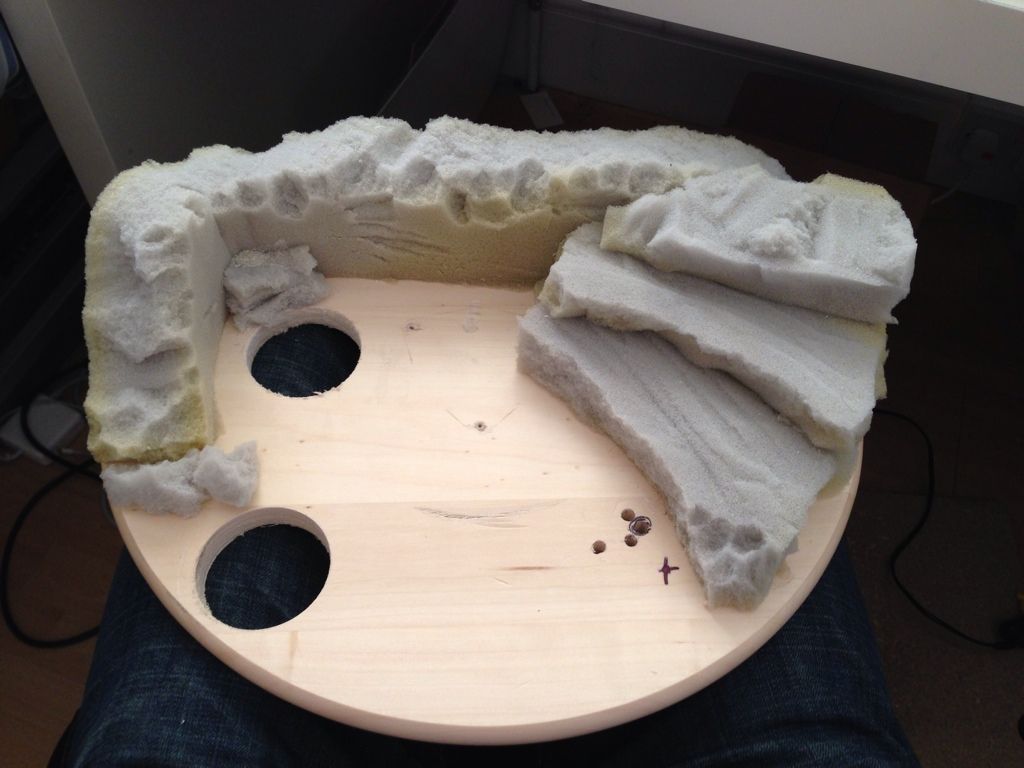 I then sculpted the Jacket. I poured boiling water from the kettle over the parts of the sculpt ive already done. This cures it VERY slightly, enough to work on another part without damage. I sculpted the jacket and sleeves, and collar. 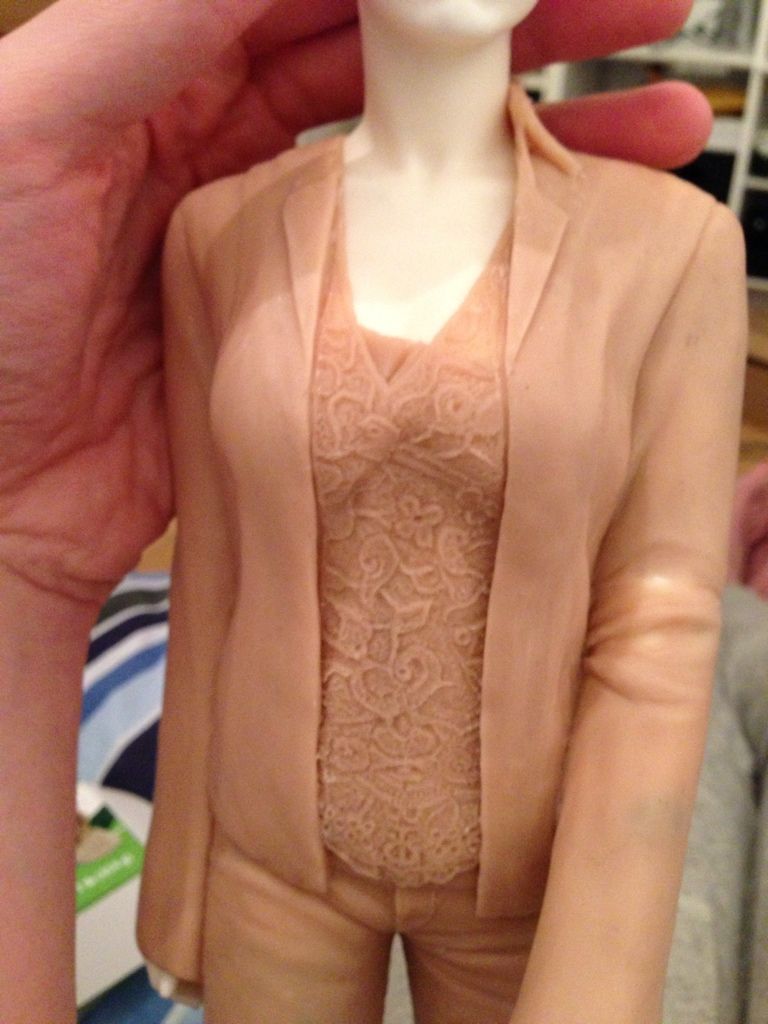 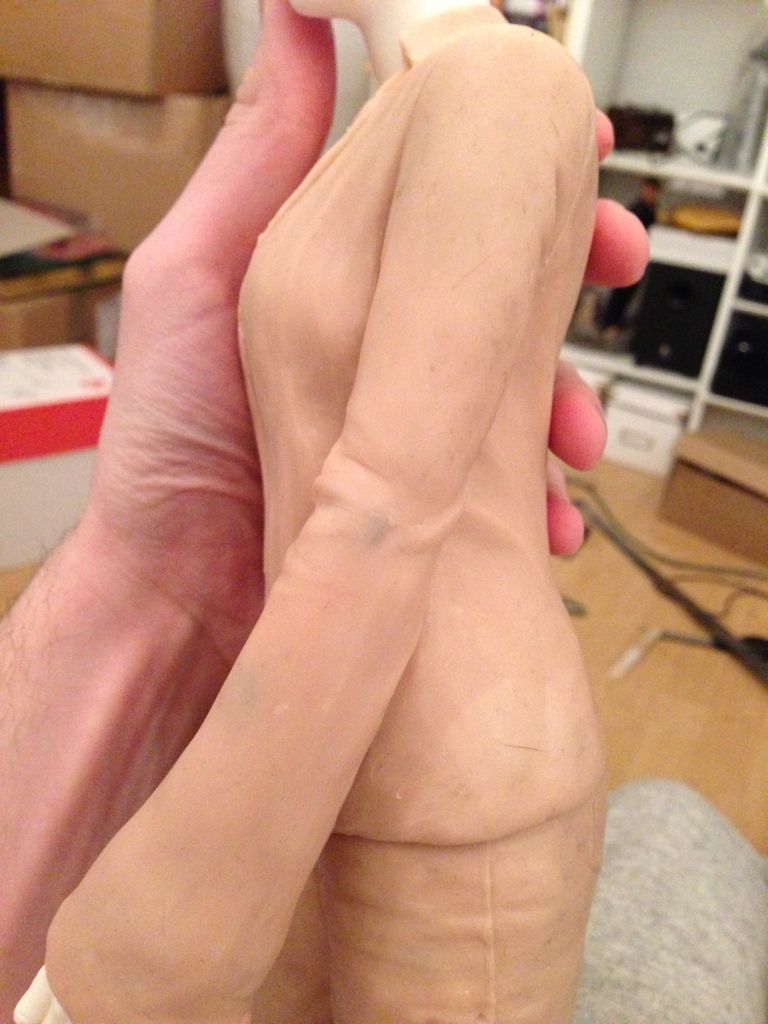   Next up was the hair. I said i would do a tutorial, but i didnt take as many photos as i wanted to, but hopefully these will help I started off by building the hair with 'snakes' which are rolls of sculpey. i then flatten into the shape after. 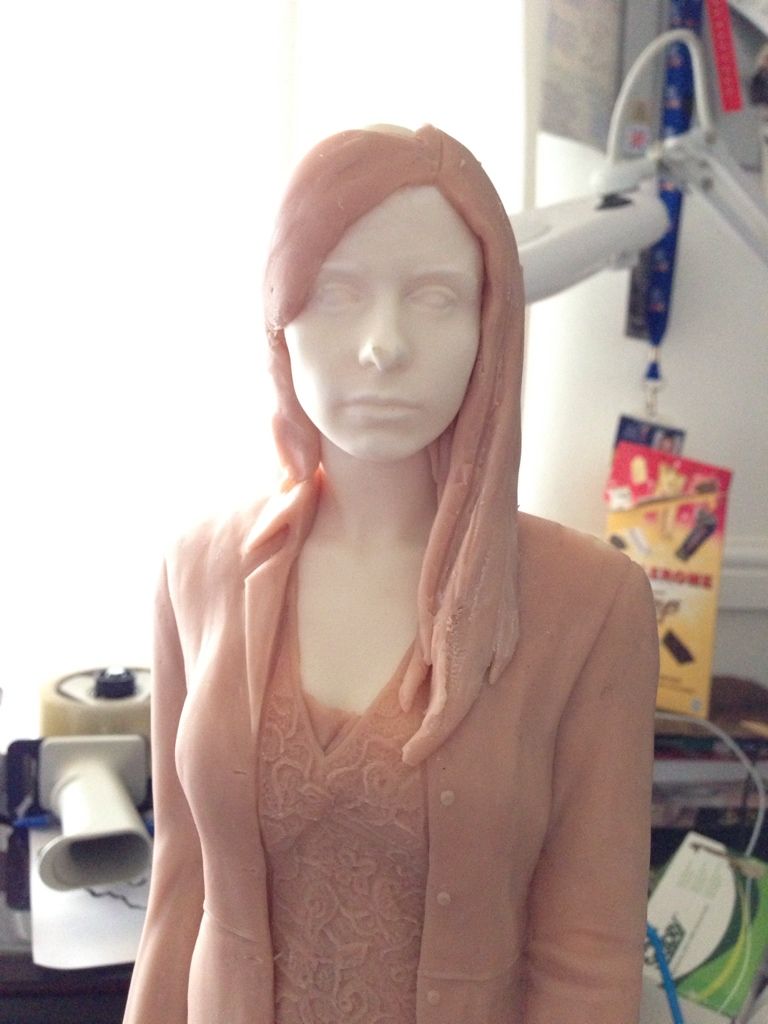 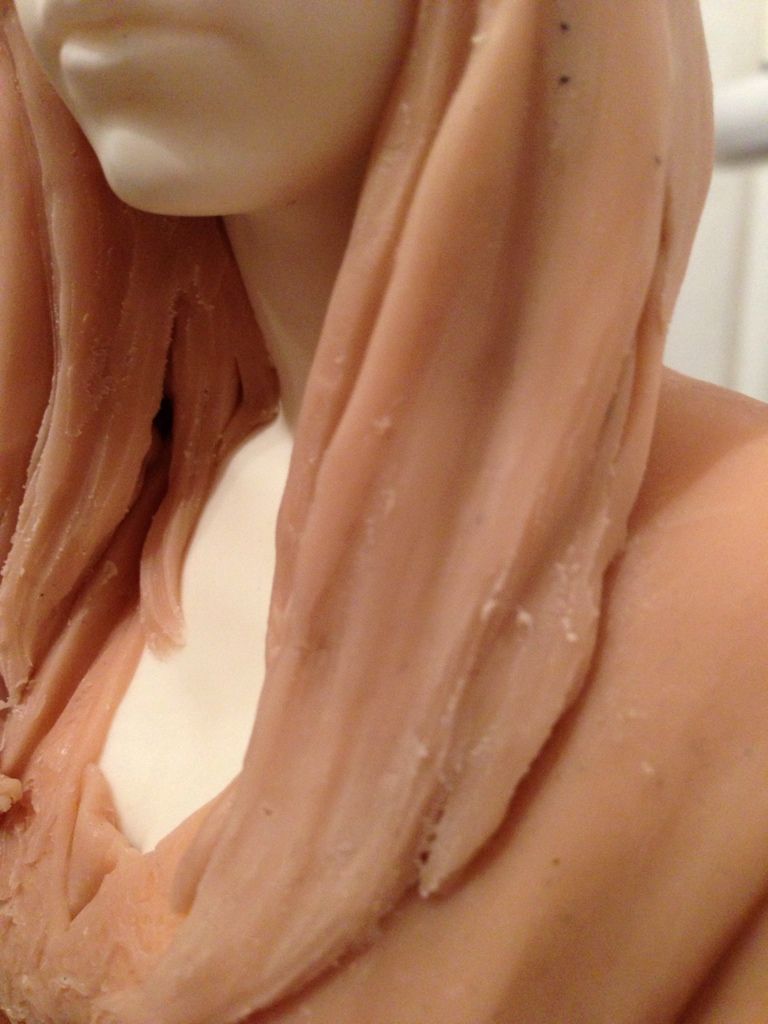 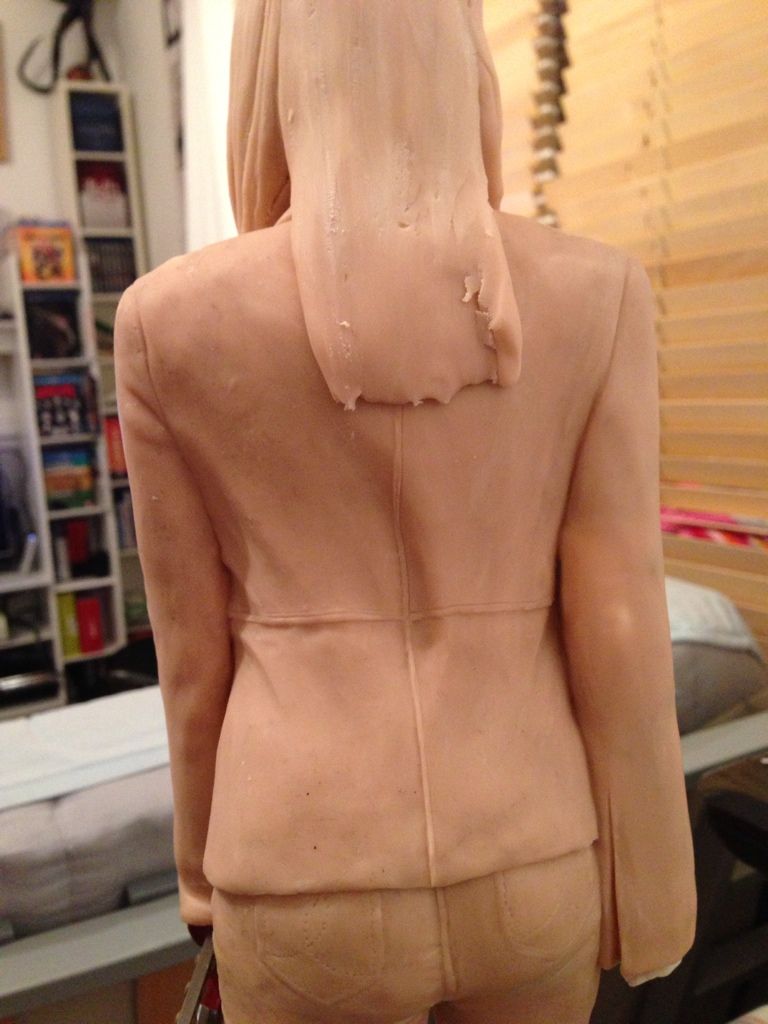 Then i begun to add detail using the end of a small paintbrush I did the same for the sides and back I added more clay, and used my fingers more than anything, to get the rough shape that i wanted, then refined it using a few tools 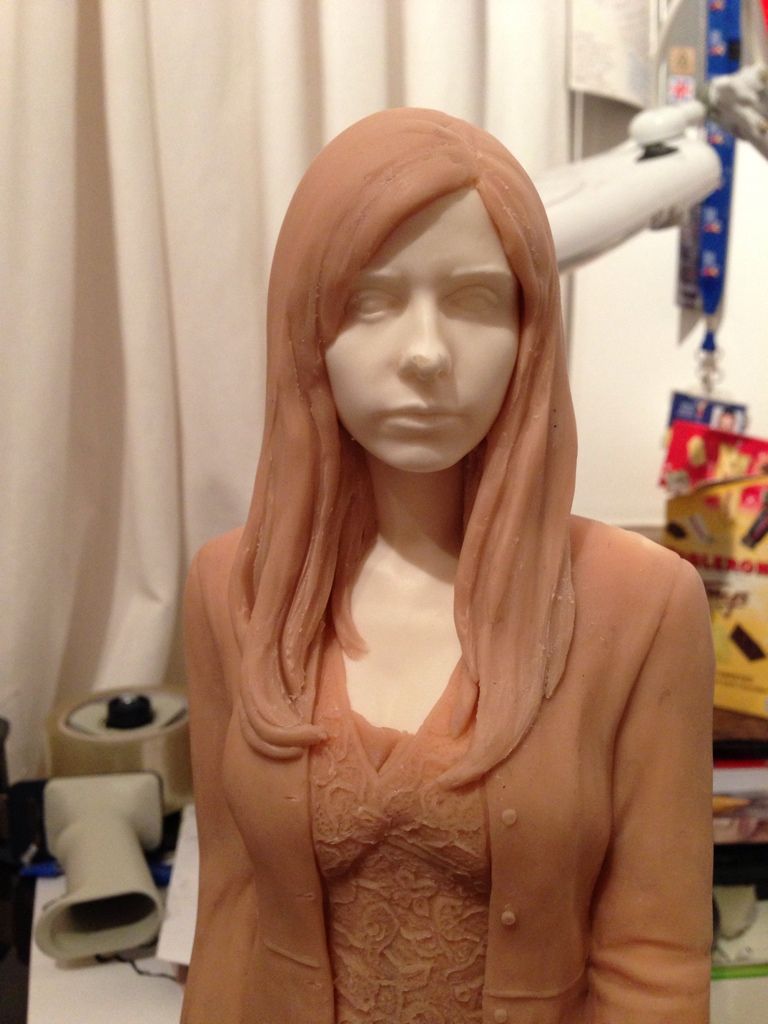 I use the end of the paintbrush to make the "locks" of hair 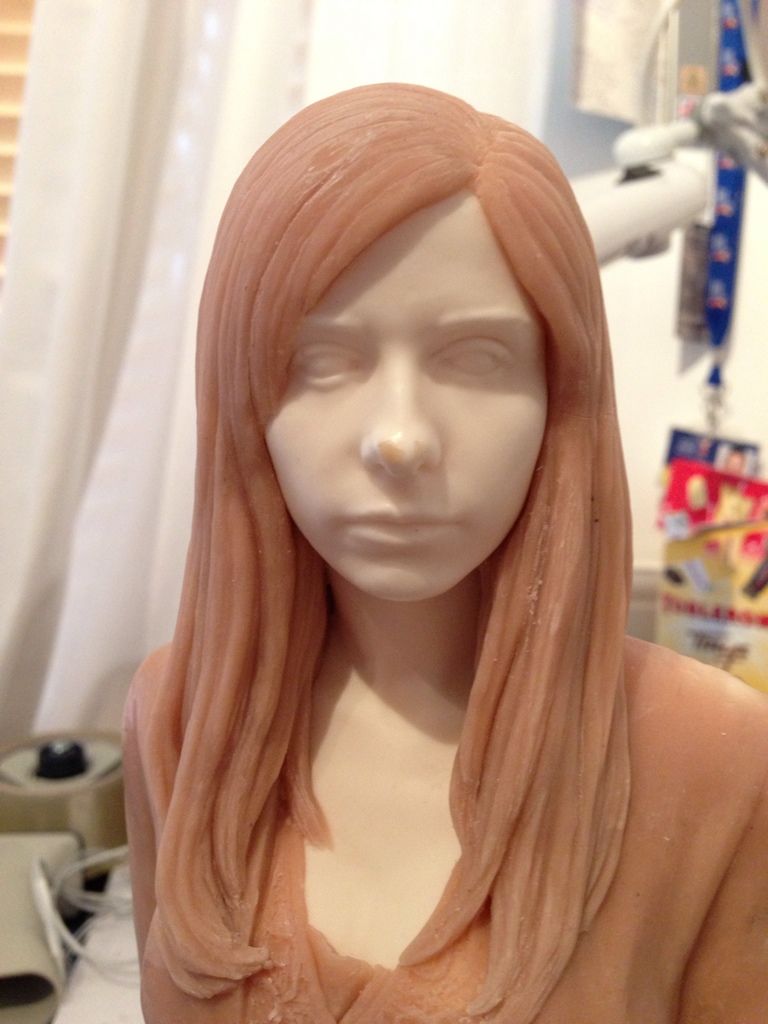 Then i use a thin tool to add the detail. Do not go overboard, and dont press to hard. To much texture can really kill a sculpt Follow the locks of hair and you should end up with a really natural effect 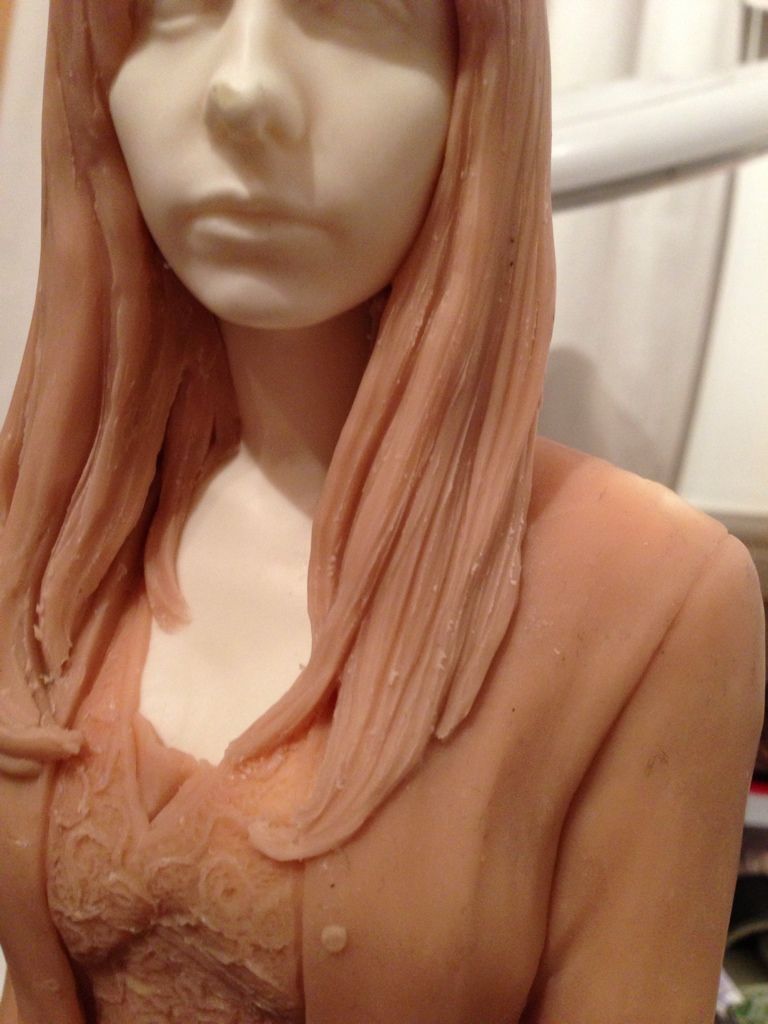 Same with the back. Large locks of hair, then finer detail. I feathered the end of the hair to give it a natural finish 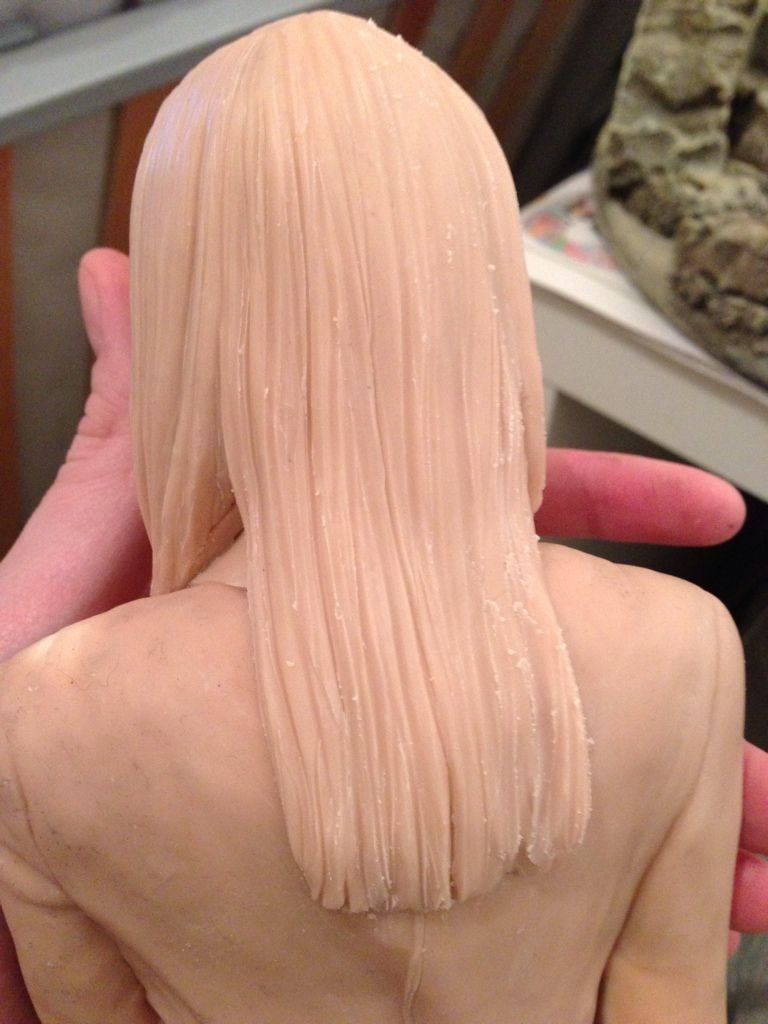 When the sculpt is done, you are usually left with some sculpey lumps. I use lighter fluid on a brush to smooth these out 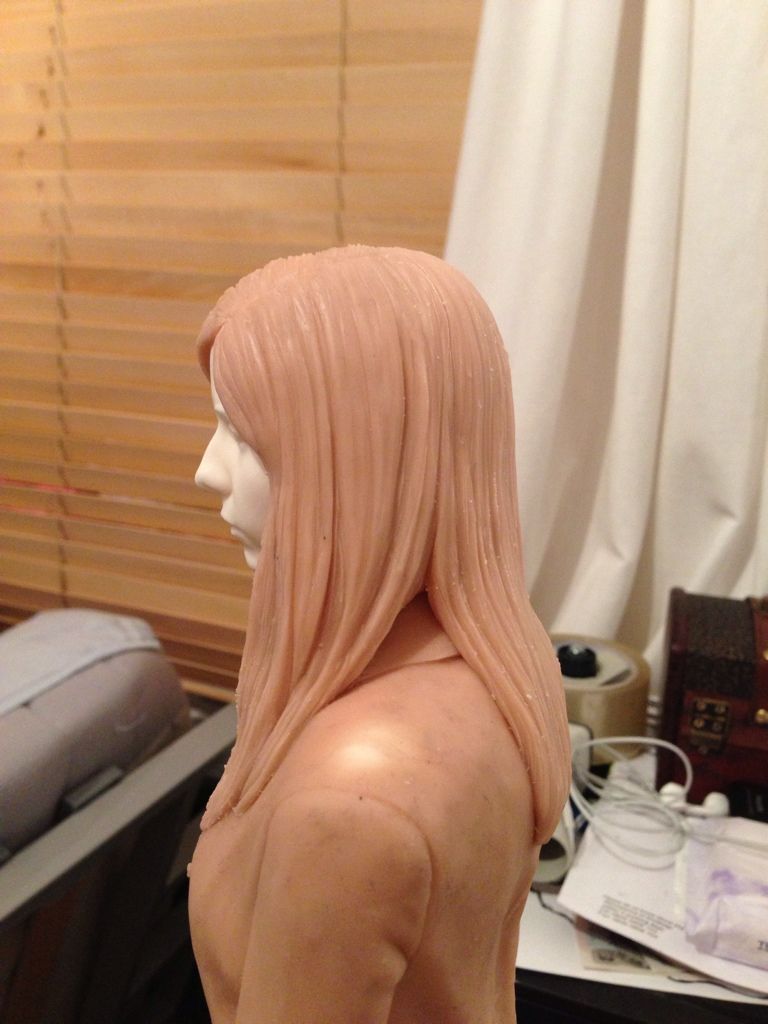 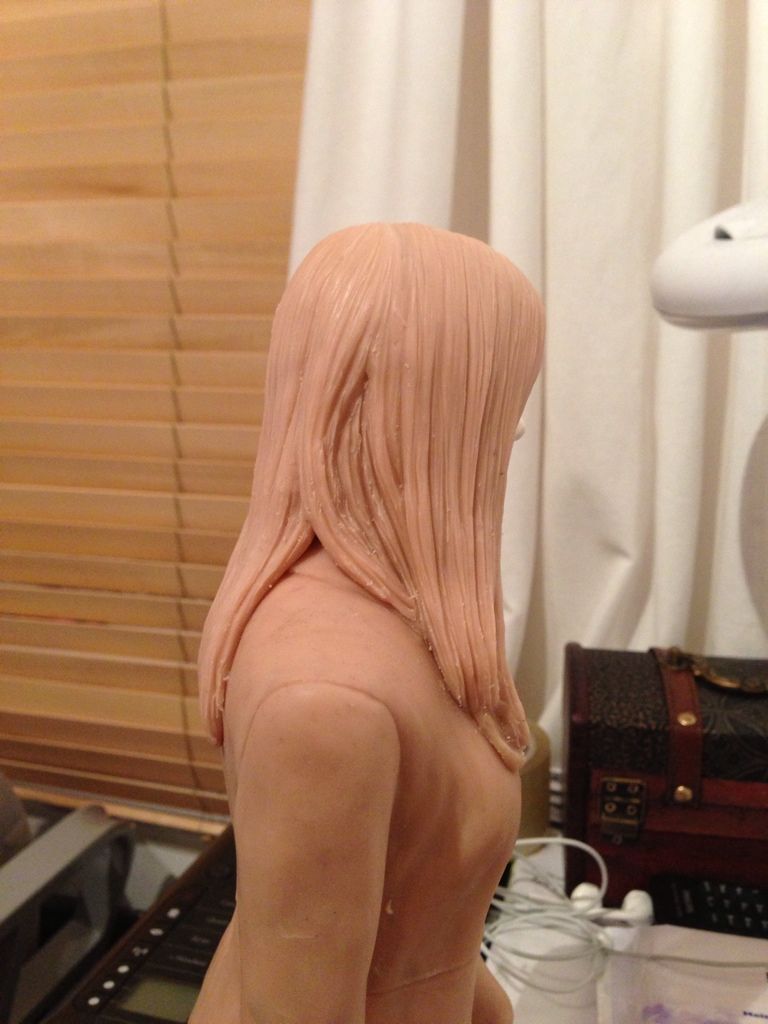 Hopefully that is enough of a guide to help you all out The scythe presented a potential problem for shipping. So i spent a few hours modifying it. It was solid metal, very hard to do but it was worth it in the end. The blade is glued into Buffys hand and the end pushes onto it when it gets to BA1 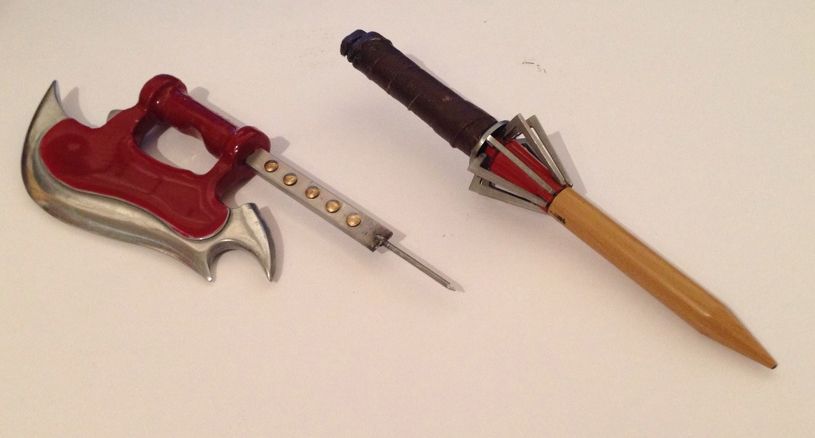 Now on with the finished thing. I painted her using the Chosen outfit colours. She had 3 pegs in her feet and screws in from underneath. There are 2 lights in her base which flicker like flames. Anyway, here are the finished photos. I hope you all like I am incredibly pleased with her Thanks Wayne 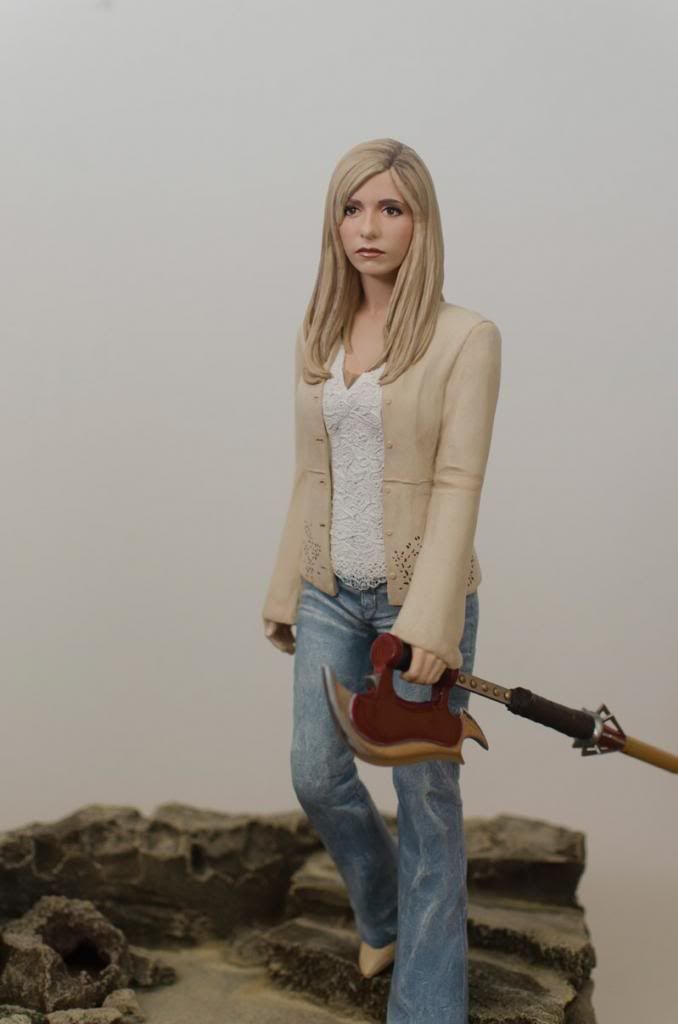 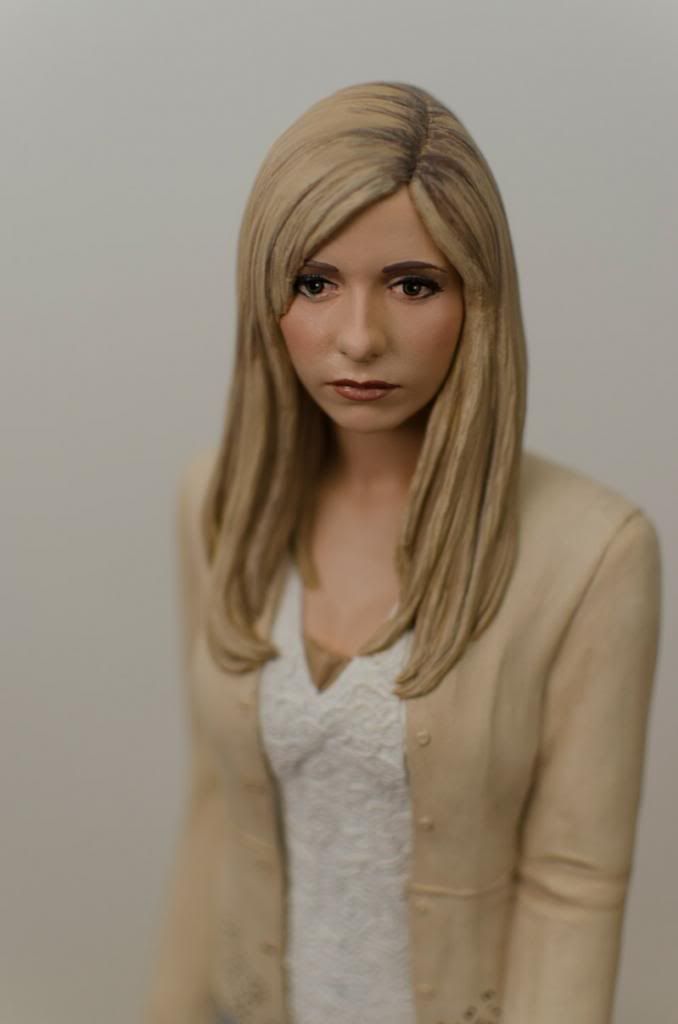 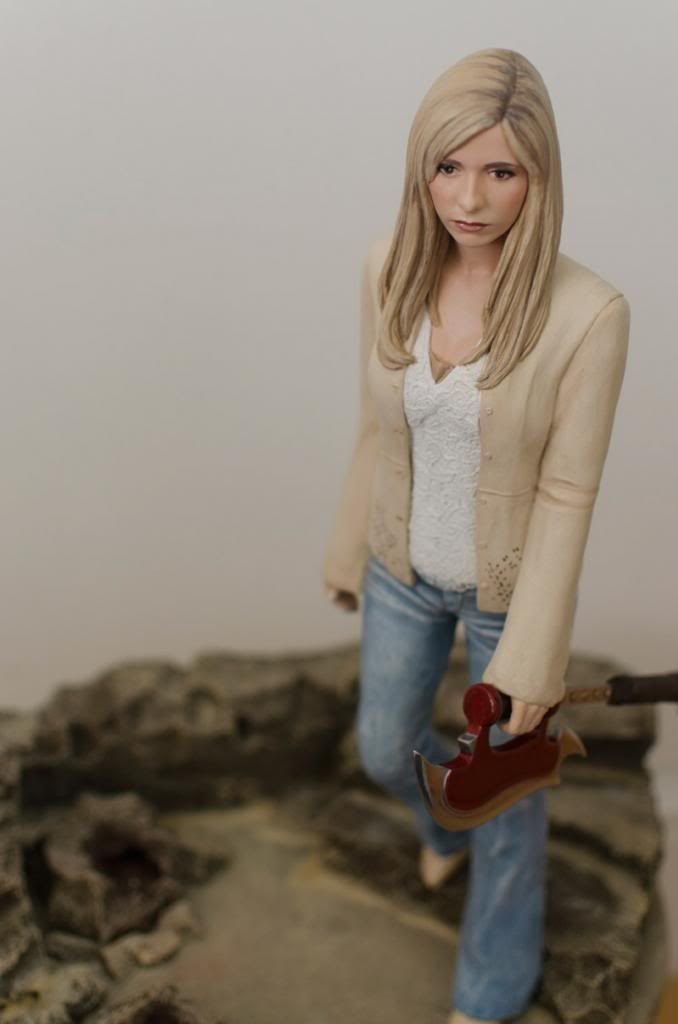 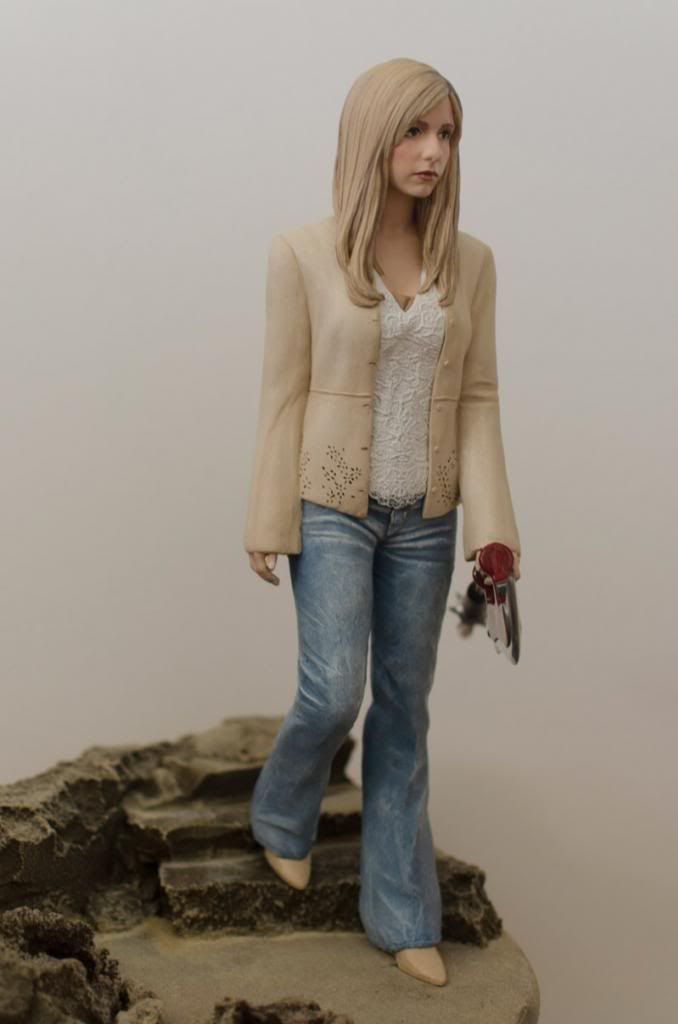 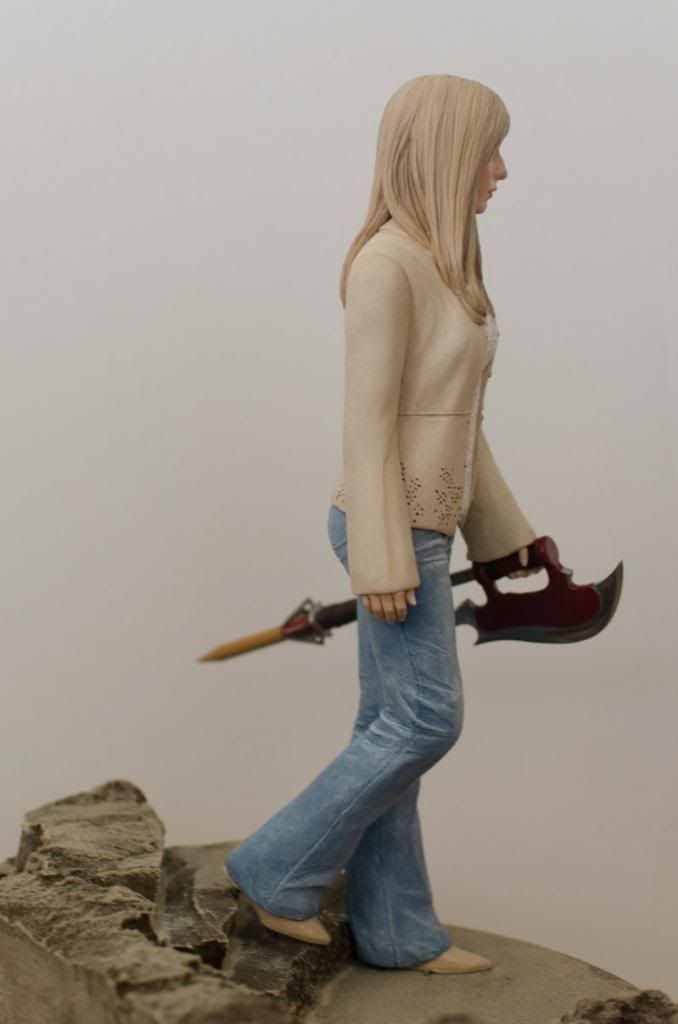 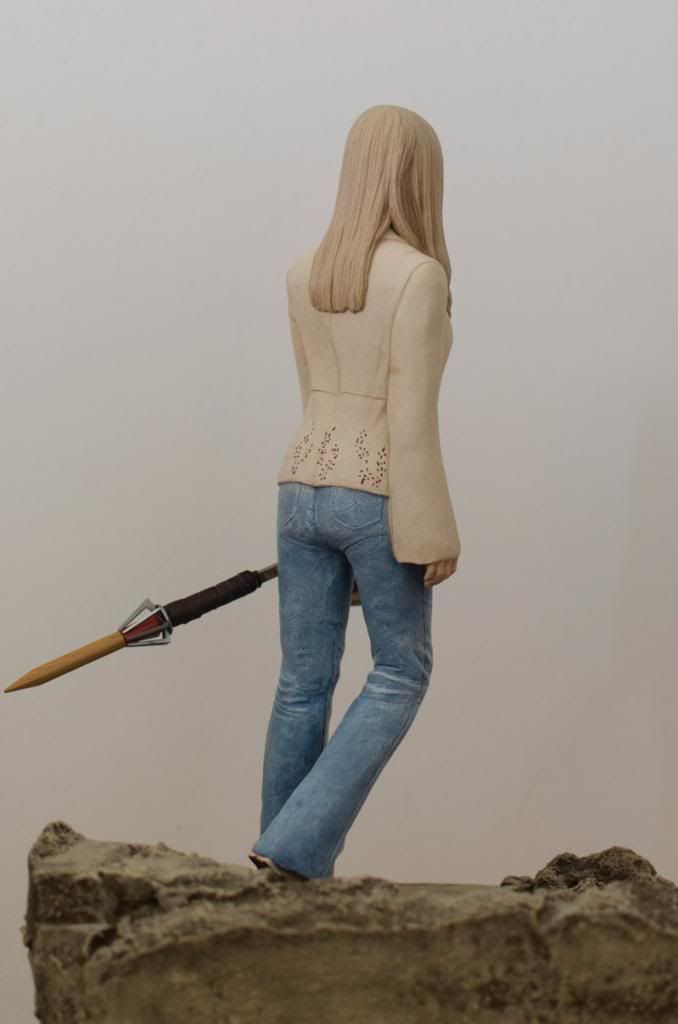 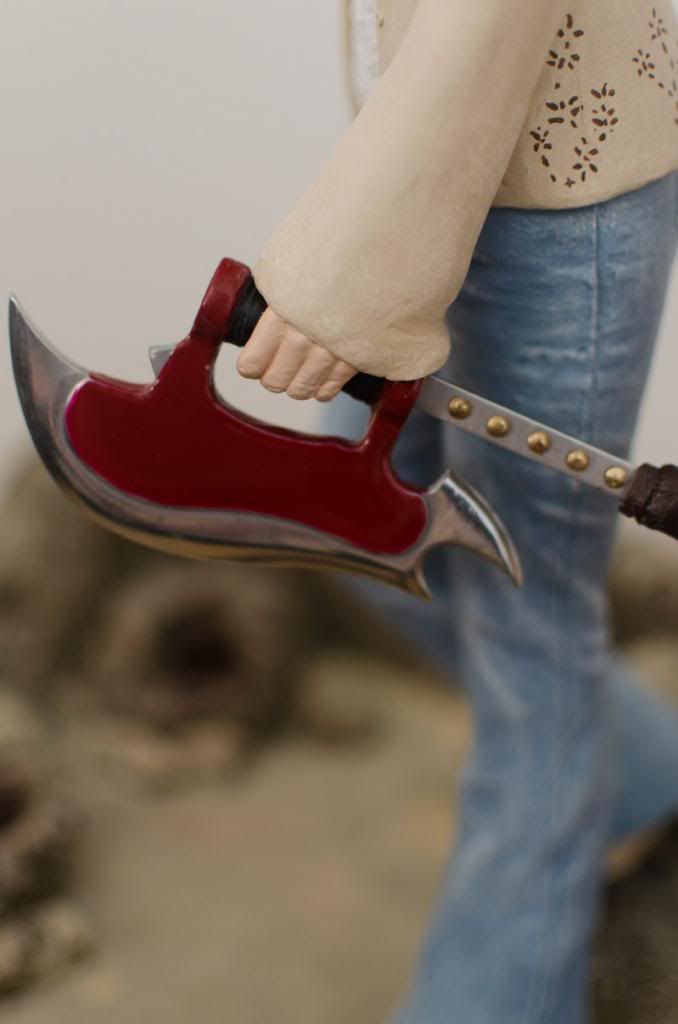 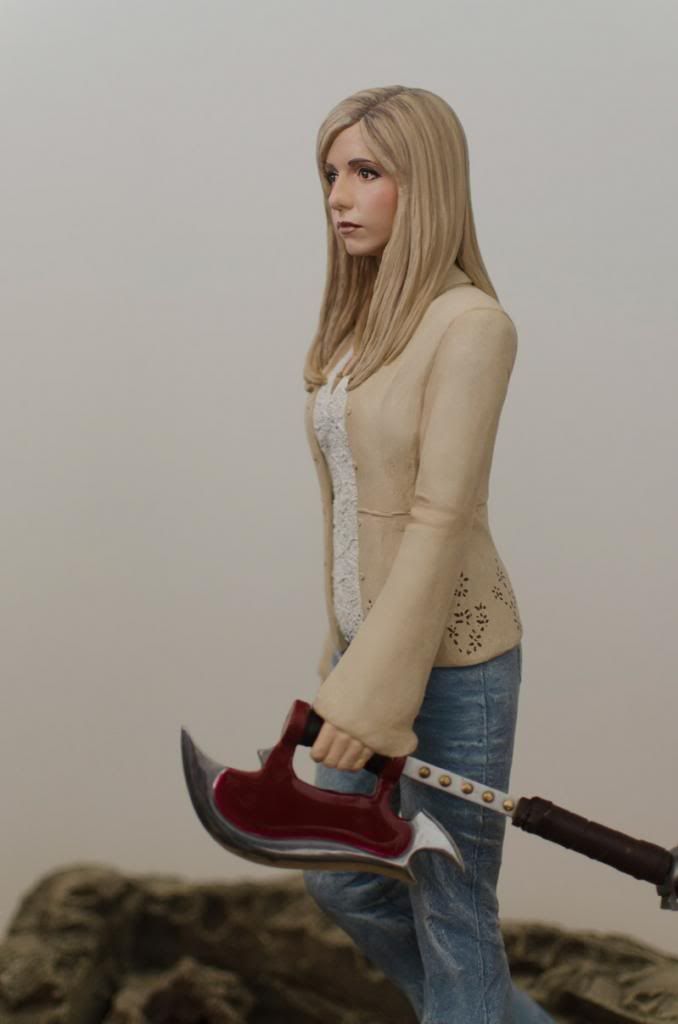 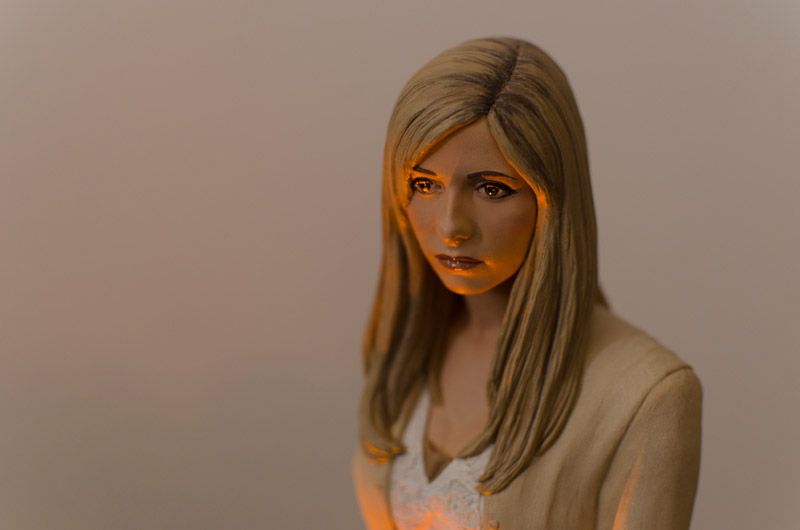 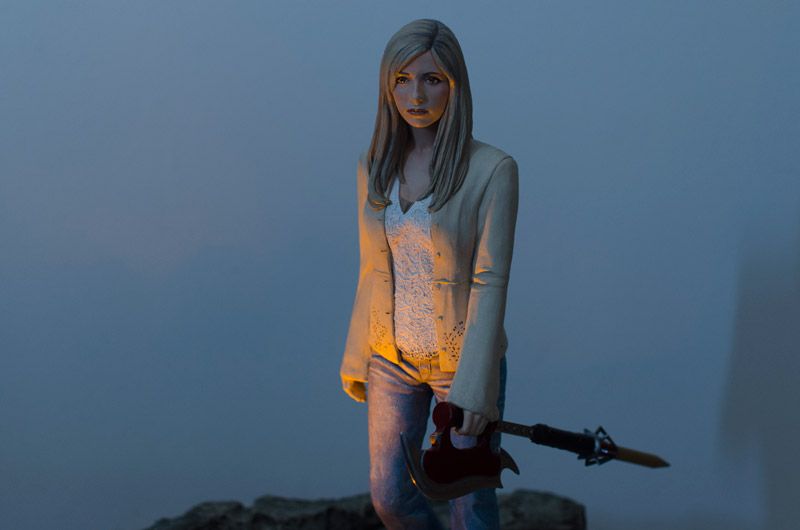 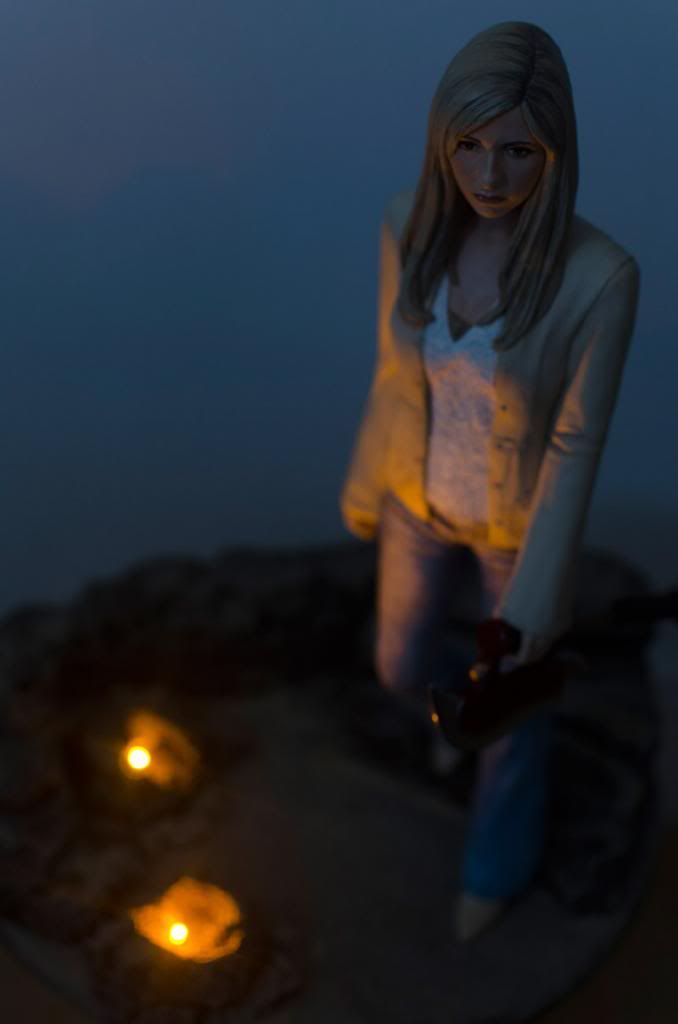 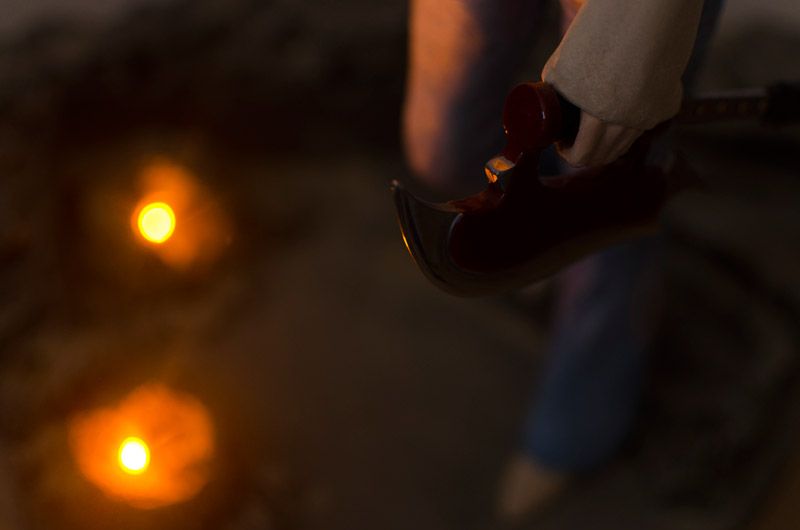 |
|
|
|
Post by willowswarlok on Feb 9, 2013 7:12:59 GMT -5
Well, they recently released a second wave, so perhaps they will again. I didn't know they released a 2nd wave? that's cool! I'm surprised they still even have the license. I made one when I was in college. probably around 5-6 years ago. I carved the blade myself, had it cast in Aluminium, polished, powder coated and made the rest using aluminium tubing etc. Anyway, I have been looking into making cheaper alternatives (Non metal) without compromising on quality. I have my original scythe model that I carved so it is possible. In my personal opinion, the released prop was too chunky. The handle on the scythe especially was very thick. As was the stake. The "leather" used was horrible as well! My bf has the prop replica and when he got it, we modified it straight away. My version was based on the rubber prop, using only photos and measurements provided by one of the owners. Here are some pics in case some people haven't seen it but like i said, i am looking into making some more at some point in the future. Wayne I made my scythe so it can be dismantled and fit into a backpack or box 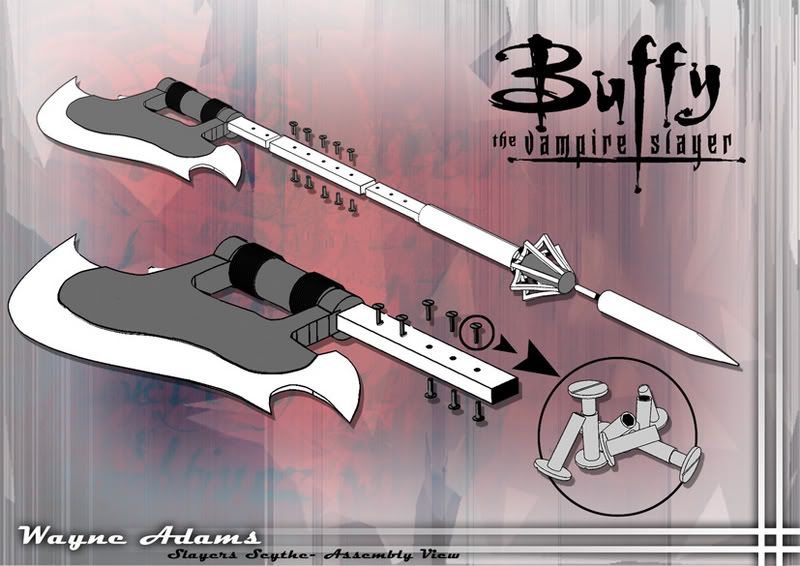 Carved Wooden Version 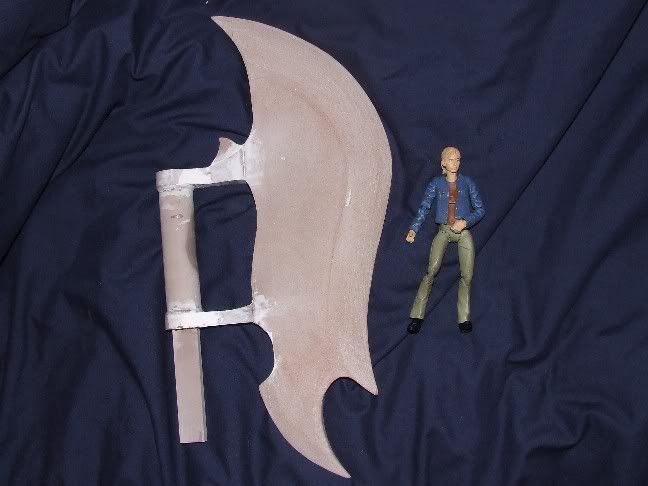  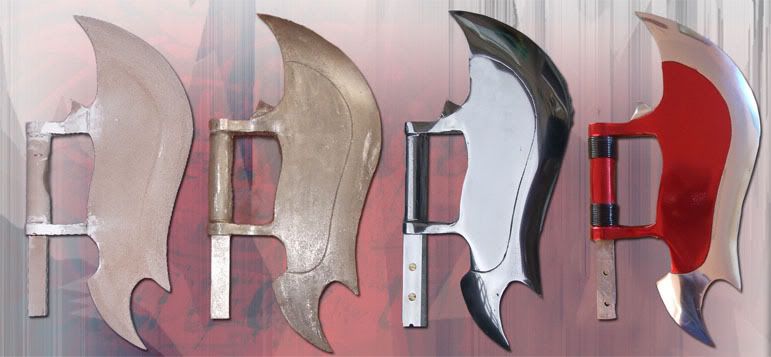 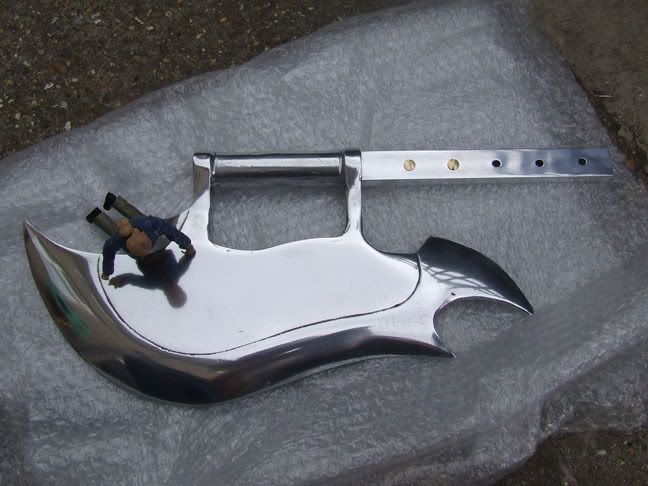 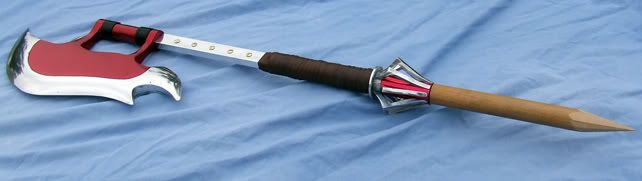  |
|
|
|
Post by willowswarlok on Feb 7, 2013 6:20:03 GMT -5
She looks great!
What parts is she made from?
The hair does look a little chunky BUT the flow of it is so natural that i dont see it as a problem. It flows beautifully, love it!
The jacket is very nice too! and the base is sweet!
|
|
|
|
Post by willowswarlok on Feb 6, 2013 16:09:33 GMT -5
Is it your BOS replica on the photo with Holly ? Yeh, certainly is |
|
|
|
Post by willowswarlok on Feb 5, 2013 11:29:23 GMT -5
willowswarlok r u really tall? next to Holly you are like NBA player tall. FYI totally hate u cuz u got to meet her in person. LOL yeah im about 6ft6". But Holly was tiny!! |
|
|
|
Post by willowswarlok on Jan 30, 2013 17:40:55 GMT -5
Edit: Im not sure, but that Life Serial Buffy (Construction Worker Buffy) COULD be probably one of Waynes first customs That Builder Buffy was indeed one of my very first customs i believe! |
|
|
|
Post by willowswarlok on Jan 30, 2013 13:45:11 GMT -5
Yea I would've stopped right about from the top of the pants to say belly button area. It is amazingly detailed. I have one question though...How the heck did Super Sculpey not dry out during the detailing? You put a damp cloth over it or something? Drying out? Ive never had a problem with sculpey drying out? Ive had figures sitting there for weeks whilst i work on them. Sculpey is usually good to go until you boil or bake. How bizarre |
|
|
|
Post by willowswarlok on Jan 30, 2013 13:11:37 GMT -5
Thanks PJ and Smiler! Yeh im going to use the Mini Scythe for Buffy. It may be ever so slightly too big but it is correct in length, just rather chunky, But i think itll look fine! Smiler, thanks it took pretty much an entire evening. I very nearly gave up haha  |
|
|
|
Post by willowswarlok on Jan 30, 2013 7:41:08 GMT -5
|
|
|
|
Post by willowswarlok on Jan 28, 2013 15:38:25 GMT -5
Awesome! Can't wait to see this finished...! How do you make creases in clothing so... real?! lol!  Thanks for the feedback everyone. As for the creases in clothes, i find the easiest way to do this is to look at you own clothes for reference. I usually get someone to pose how i need and photograph it. For instance. I stood on a step and looked at how my jeans folded, creased and stood. Then implemented this onto the clay. I usually build up the rough shape first and then add snakes/lumps to build up bulges and folds. I then use tools to dig out the creases. It takes time but if you think about how fabric falls, its much much easier to get the hang of Cheers Wayne |
|
|
|
Post by willowswarlok on Jan 27, 2013 16:20:22 GMT -5
Thanks both of you Sarah message me any specific questions you have and ill help any way i can |
|
|
|
Post by willowswarlok on Jan 27, 2013 12:51:17 GMT -5
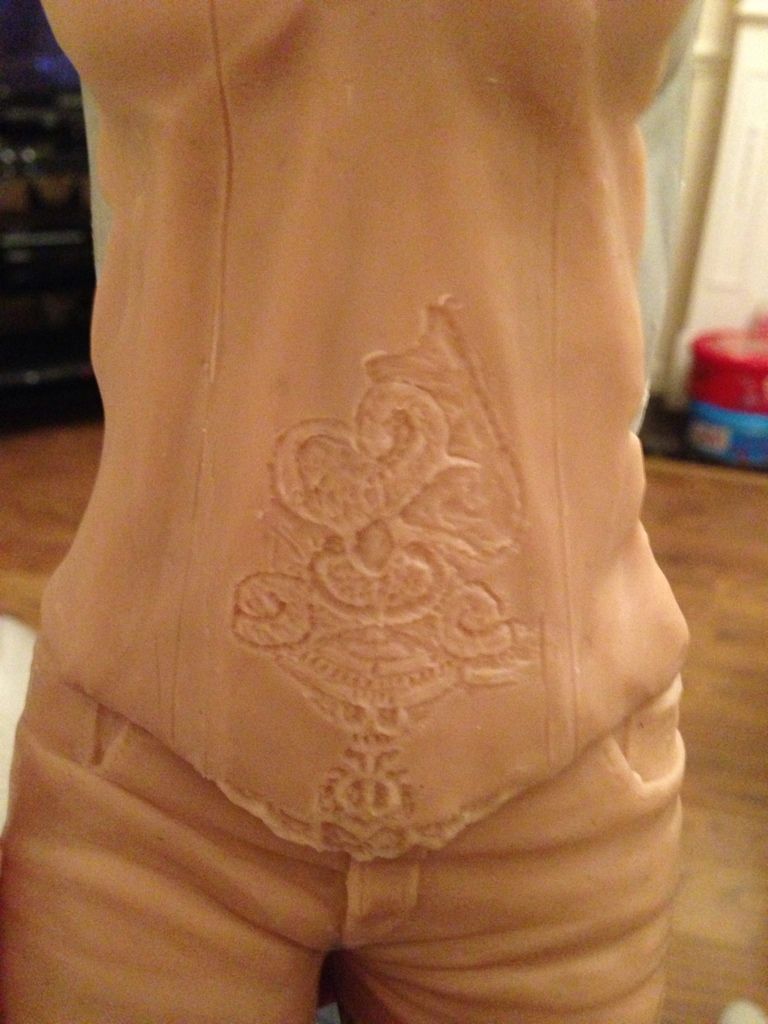
She's looking incredible so far, can't wait to see more as she progresses. Out of interest, why is some of the cast grey and some cream. Is it 2 different casting agents? How do you boil her when she's this size, do you have a saucepan big enough? X Thanks for the comments To answer your question about the casting. I use fast cast, which is great but it can become quite heavy, especially in large pieces. And its also pretty pricey. I use a filler powder to 'bulk' it out. This makes the resin go further and lighter. Its important to try and keep the weight of these down, because once you add the sculpey it becomes very heavy. Considering i usually use around 2 boxes of sculpey on these things. Shipping is annoyingly weight based, so to cut it down as much as possible, i try to keep it as light as possible before adding the clay. I always cast the head and arms in pure resin, to ensure the filler powder doesnt create a pitted effect on the skin. I also do the legs in normal resin if they are on show Hope that helps answer your question? Also, i use resin to 'glue' the parts back together. Since resin chemically sticks to itself, its the best way to do so I did do the lower halves of these legs in pure resin because she is standing on one foot, i needed the leg as strong as possible for the metal conduit in her leg. Ha! As for boiling. I usually use my Mothers big cooking pot. But even with that i can only boil half at a time. It usually requires multiple boils, holding it in the water etc Wayne Finished the Jeans i think. I had to use the flash, apologies for the shine on the clay  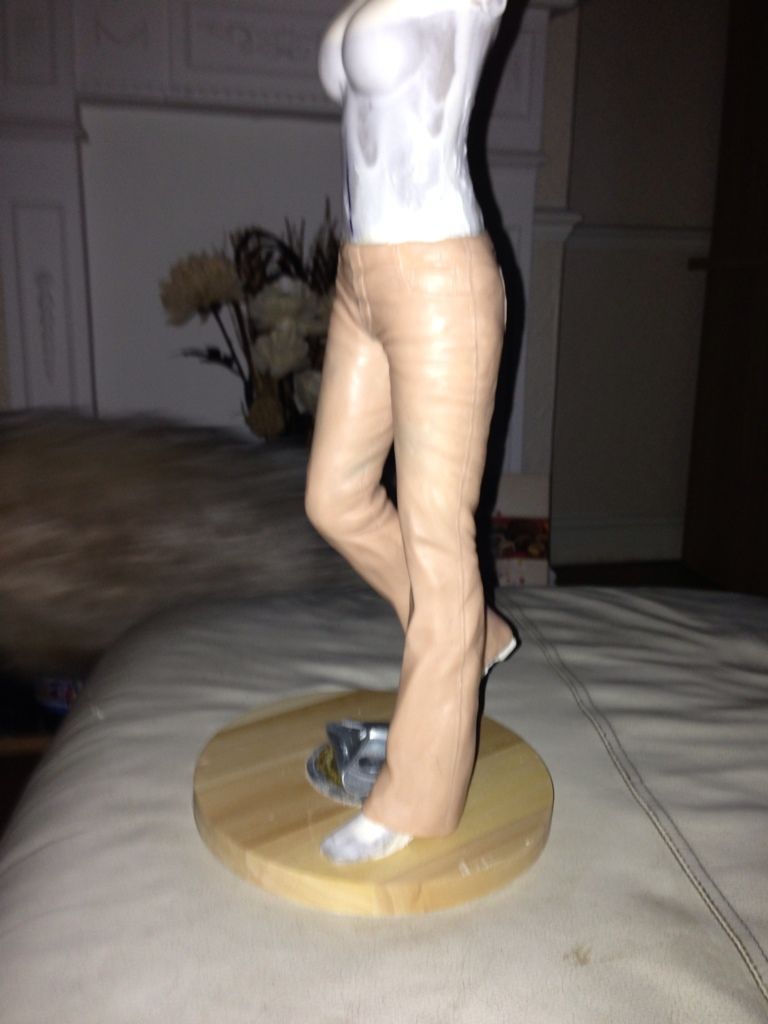 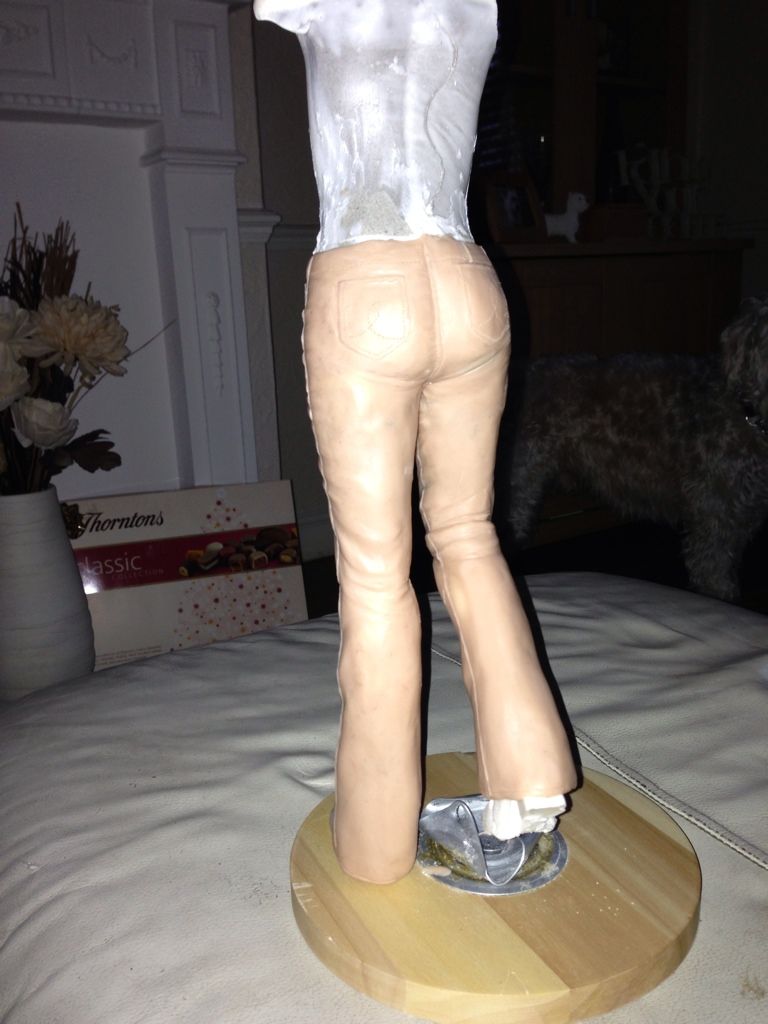 |
|
|
|
Post by willowswarlok on Jan 27, 2013 8:42:11 GMT -5
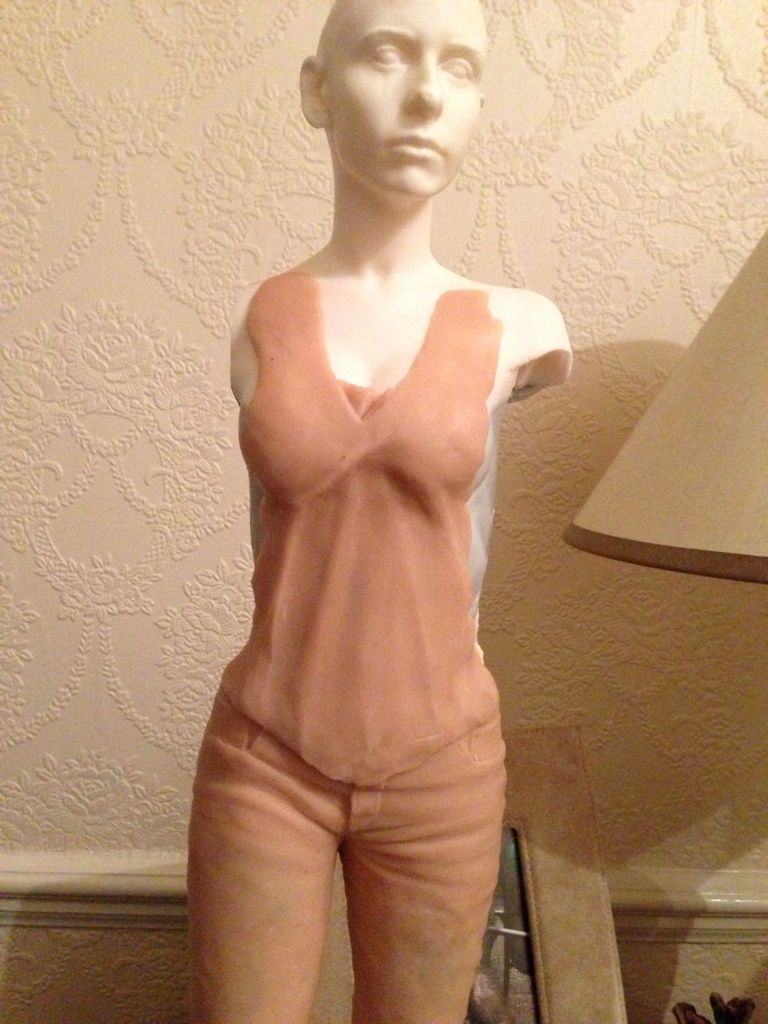
Hey Everyone Its been a hell of a long time since ive posted any sort of in progress photos of my work. I get so wrapped up in sculpting that i sometimes forget to take photos but I will take photos of often as possible for this one. This is a commission, long overdue. Ive done 5 Premium Format Buffy customs before (Cheerleader, Gift, Innocence, Anne and Primeval) This one will depict Buffy from Chosen when she is descending the stairs to the Hellmouth. It is not strictly screen accurate but it is based on screencaps and then modified to fit. So i will be working on the base after this is sculpted. It will have a light up feature also. The base pictured is just a holder for Buffy so she can stand up. Anyway, on with the figure! I started with a Premium Format Buffy cast. Since the body is in such a weird pose, I had to cut and pose her in several parts to get the position i wanted. Cutting the waist, legs and hips. Then reinforcing with screws and resin. Once i was happy with the pose, i made sure it was all secure and started to work on the sculpting. So far, ive sculpted only the jeans, and they arent detailed completely. But i hope you all like! Cheers Wayne PS. Please forgive the dirty/dusty floor. Cutting this stuff is messy! 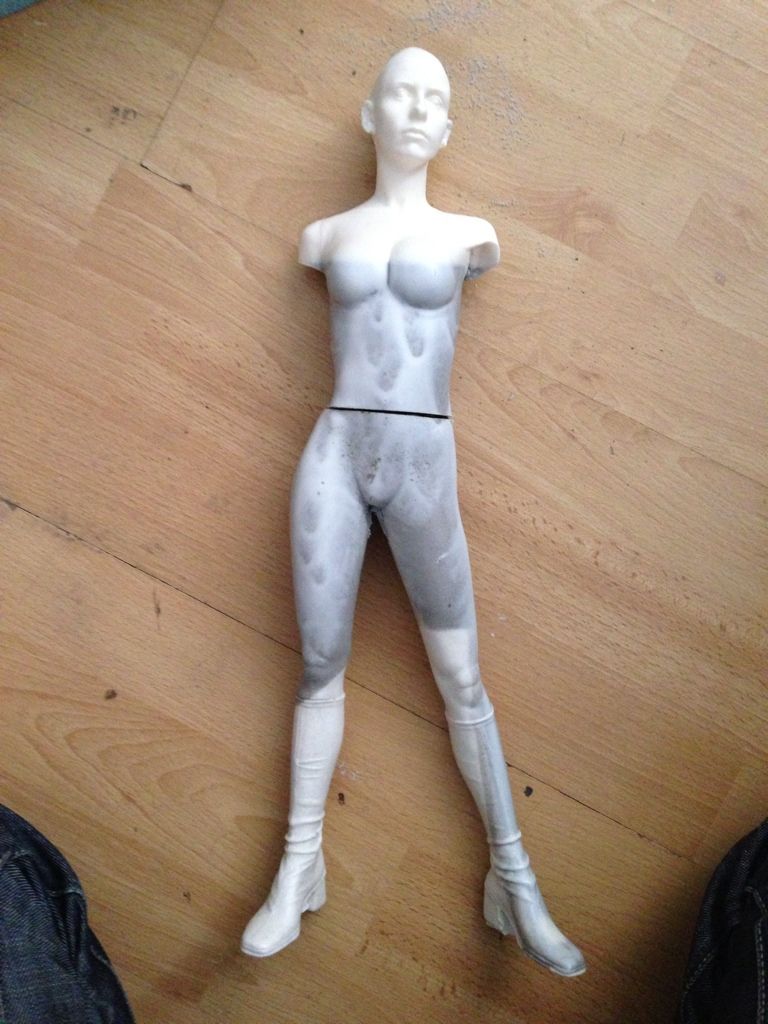 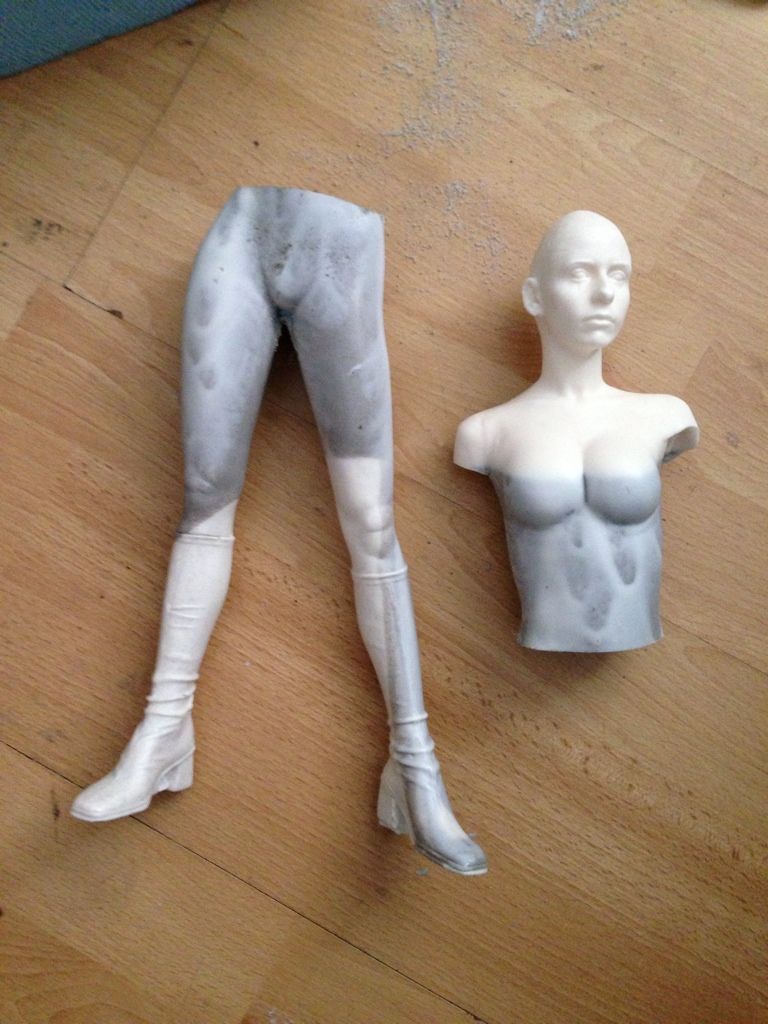 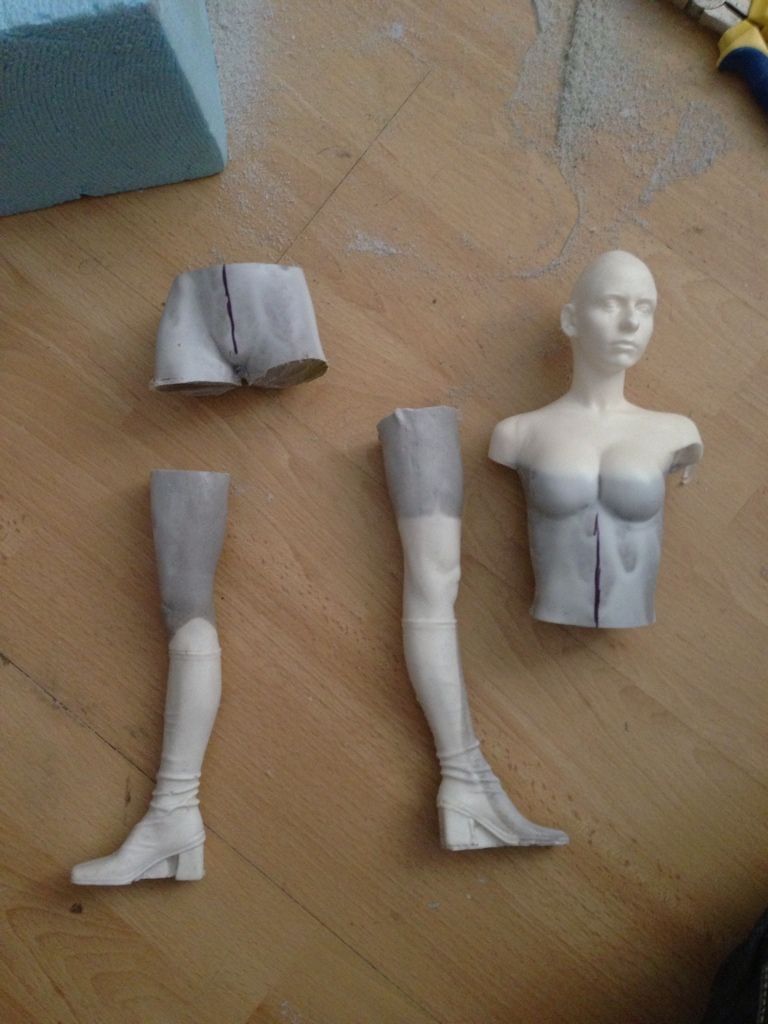   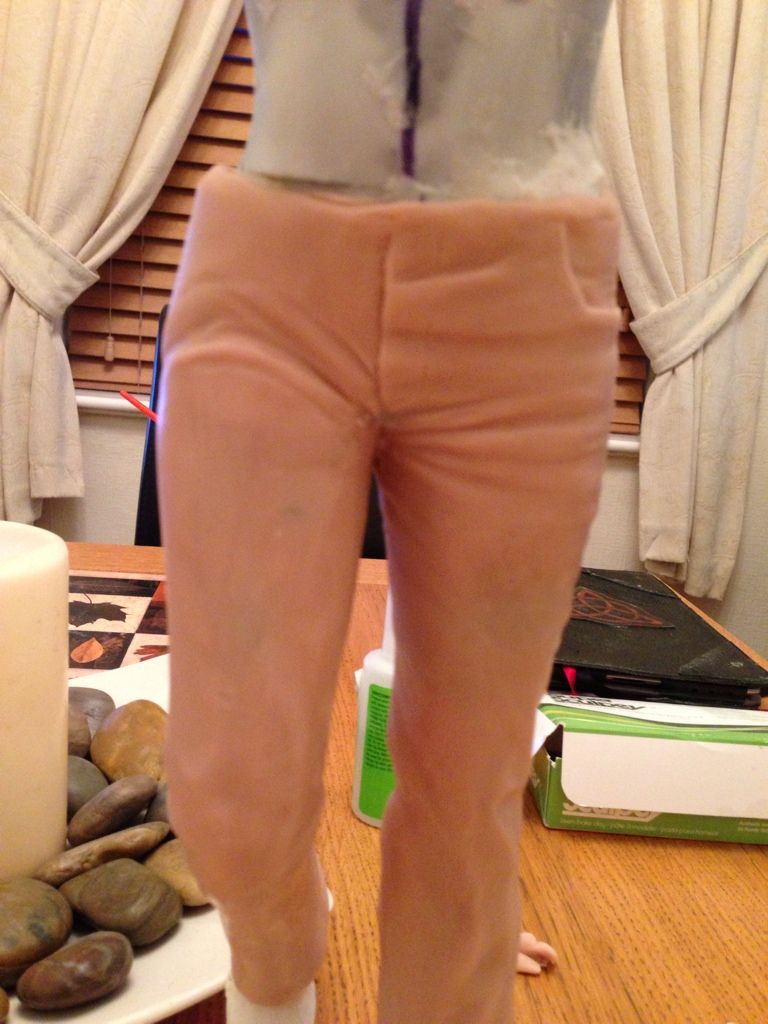 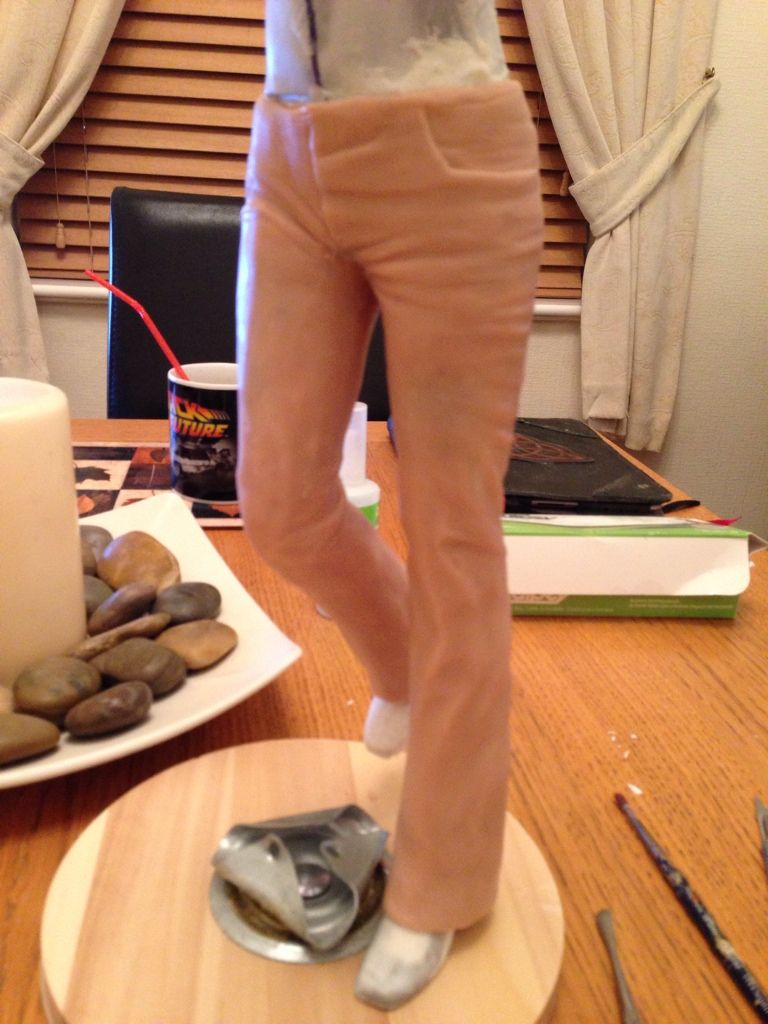  Possible Pose with the Scythe 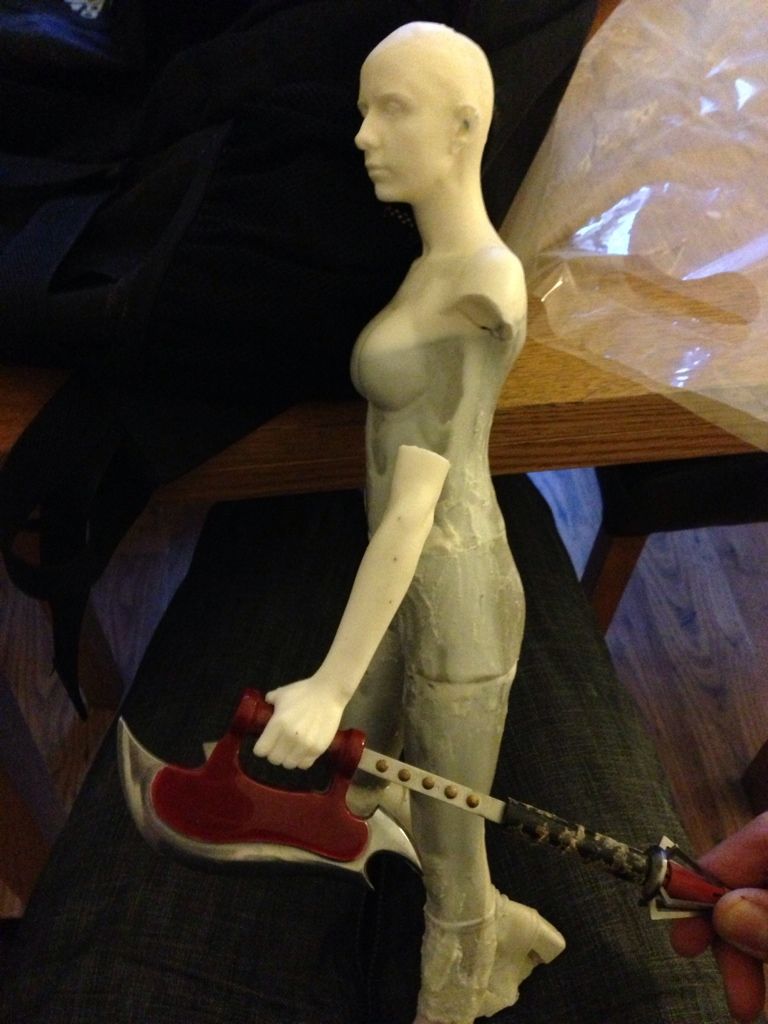 |
|
|
|
Post by willowswarlok on Jan 27, 2013 8:08:08 GMT -5
Thanks for the comments everyone I am really pleased with her, its nice to work on something outside of the comfort zone with customs. Ive missed posting on here I will try and get a video of her at some point Cheers Wayne |
|


 the new details make so much difference, they give her some great depth