|
|
Post by Jedi Doug on Jul 7, 2003 9:53:59 GMT -5
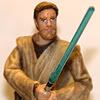
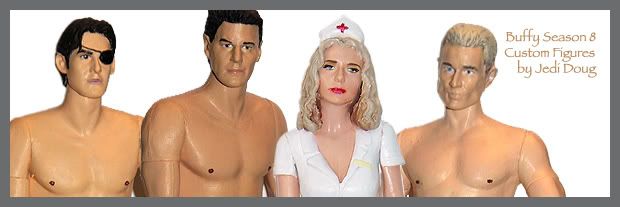
I've been working on a few projects lately: - Cordelia from Reptile Boy - Buffy from Reptile Boy - Shirtless Angel (in progress) - Buffy with up-do (revised earlier version) - I based the new hairstyle on the one she has in "Innocence." View them at: www.geocities.com/touchthefire2000The 2 Reptile Boy figures were commissioned by FaiThNSaR@aol.com. She is going to a convention in a week or two and hopes to meet the actor who played Machita in that episode. I also did custom packaging as well, plus accessories - sorry, no scan. I still need arms for the shirtless Angel, if anyone has any... (hint, hint). Doug |
|
|
|
Post by writer on Jul 7, 2003 12:25:37 GMT -5
I think you did a good job on the Buffy. I like how you got her makeup right too Only I thought that her lips were more of a dark purple frosted color. The Cordelia looks good. Nice and smooth painting.
The Angel I really, really like, just need to add a few muscles and arms and it'll turn out awesome.
|
|
Yik
Victim
 Wanna buy him a pint. Bloody made my day.
Posts: 59
|
Post by Yik on Jul 7, 2003 12:29:29 GMT -5
hey Jedidoug,
u got some great customs there. cordy looks fab, i like the new hair which is a lot more accurate then MACs job. the innocence buffy is great from the side. its a bit wierd from the front, but i think thats because he's looking down. with shirtless angel, a bit more sculpted muscle and a lighter paint should do the trick. all in all, very good job, keep at it,
|
|
|
|
Post by motownslayer on Jul 8, 2003 9:15:21 GMT -5
Those are great. I love Buffy's hair! Can't wait to see Angel all finished!
|
|
|
|
Post by nbt on Jul 9, 2003 2:44:35 GMT -5
they odnt look bad, the shirtless angle looks to be ocming along nicely, the cards look good...i like the buffy..
|
|
|
|
Post by Willfan on Jul 9, 2003 13:16:21 GMT -5
Very nice! How did you make the card, I've always wanted to do that...?
|
|
|
|
Post by Jedi Doug on Jul 9, 2003 13:52:23 GMT -5
Making custom packaging is pretty easy if you have the right computer equipment. I happen to work in publishing, so this is stuff I use all the time.
I took an original backer card from one of my figs (I keep all the packaging in a closet, for a rainy day) and removed the plastic bubble. Then I scanned it in at hi-res (300 dpi) and did some manipulation of it in photoshop - my attempt at getting the bubble off the card wasn't without some tearing. Photoshop allows you to work on your photo in layers, so you can create a layer for the template, a layer for the photo, a layer for the text, etc., which you can change for each figure.
It's actually pretty easy, but time consuming. Once the photo is to your liking, you can print it on a colour laser printer - I did mine at Kinkos. Then I use a little spray adhesive to adhere it onto matting board. It's a little heavier than the cardstock MAC uses, but it's a lot nicer than bristol board.
If anyone wants a custom backer card (card only, without the plastic bubble), let me know. I have the BTVS card at the moment, but could also do ANGEL as well.
|
|
|
|
Post by Rogue on Jul 9, 2003 21:33:20 GMT -5
Love that Cordelia, and Buffy's dress ;D Those card backs are awesome! You've put a lot of work into them, and it shows. There might be a few cards I'd be interested in having made... I'll let you know when I do  I'd rather pay someone else to make it than try it myself   How do you get the bubble attached? I imagine you have to use the bubble that the figure initially came with. And the edges would have the cleaned off (all the cardboard that's left on it). I've tried this before with a Star Wars figure that I bought in its bubble (minus the card)... not easy... |
|
|
|
Post by Willfan on Jul 9, 2003 22:26:44 GMT -5
That's FANTASTIC! too bad I don't have a scanner, but computors and I don't really like eachother anyway...  |
|
|
|
Post by Jedi Doug on Jul 10, 2003 10:21:44 GMT -5
Putting the bubble on is a tricky business.
I used to belong to a Star Wars group and one of the people in it had a company replicate the bubble from vintage SW packaging. Because they only take bulk orders, one design was decided upon (and it accomodated all sizes) and everyone inthe group (practically) bought a bunch. I think they were only 50 cents each or something, but they were pristine and so easy to attach to the card backs.
But I digress...
The card backs I did for Sarah last week were a bit of a rush job and aren't 100% authentic. I used the bubbles from 2 existing figures I had. Because I had slit them open to get the figures out originally, I decided just to continue the slit all the way around. What I had was basically the bubble (front and 4 sides) without the flap that extends from the 4 sides. In its place, I just used hot glue to attach it to the card. It doesn't look bad, but it isn't perfect. If you're a perfectionist, try to remove all the paper from your bubble (I imagine there are lots of products that will do this - but don't use anything containing acetone, unless you want to melt the plastic!) and then adhere it to the cardboard. Or, find a company to replicate the bubble.
I remember there was a guy in the group who custom-made the inner bubble (the one the figure actually sits in) by taking a sheet of acetate and laying the figure on top of it. He built some contraption that would hold the plastic taut and allow the figure to lay on top of it. Then he'd pop the whole thing into a low-temp oven and heat it until the plastic became pliable enough that the figure would sink into it a bit. I've never seen this done, but this is how he described it. As someone who cures my sculpey with boiling water rather than a hot oven, I'm a bit skeptical, but you never know....
If people are interested in getting custom bubbles manufactured, I can ask my friend from the SW group where he got his done and maybe as a group we can place an order for the large MAC buble.
|
|
|
|
Post by Rogue on Jul 10, 2003 11:50:49 GMT -5
Thanks Jedidoug for sharing that info. That sounds innovative and fun, making one's own bubbles I imagine if there was enough demand, we could pitch in and have some made. Edit: Ooo, or if MAC is going out of business, maybe we can buy a bunch from them?? How do you normally attach a card bubble to the card? I mean when the four flat edges are still intact. I've worked in factories before, and have seen some machines and processes... I used to think that manufacturers glued bubbles (aka blisters?) to the cards. But I've worked with sonic welders, and wondered if that's how they do it? On the right settings, I've seen thin plastic get sonic welded to hard plastic. |
|
|
|
Post by Jedi Doug on Jul 10, 2003 12:31:48 GMT -5
I've used clear silicone to "glue" the plastic bubble onto the card when I made custom packaging for my vintage SW customs a few years ago. Seems to work just fine.
|
|


 I'd rather pay someone else to make it than try it myself

 Shine on down...