Post by MsBig on May 22, 2008 3:44:35 GMT -5
I took photos at each stage of the sculpting this custom, so that it would work as a bit of a tutorial. I'll explain what I was doing and why at each stage. I boiled to set the sculpey after each stage.
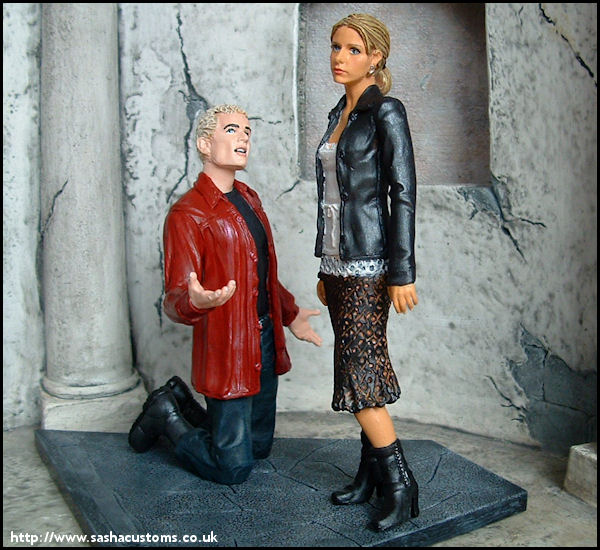
Rest-in-Peace Buffy
Reference & Parts
I used the OMWF Buffy head, Anyanka body and Willow arms.
Stages 1-3
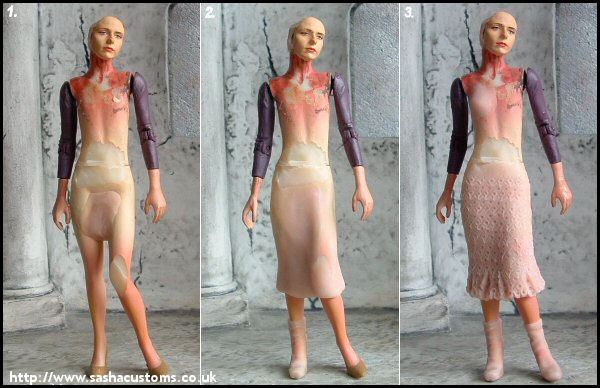
1. I trimmed the jawline of the Buffy head so that it would work better with a hair-pulled back style. I trimmed down the stomach, hip and knee on the Anyanka figure. This is not because she is fat (far from it) just that I wanted to change the posture. Anyanka is arching her back, and pushing out her stomach and also jutting one hip. The knee goes quite far forward. I wanted Buffy to be in a more casual pose. I find it is best to start with as skinny a base figure as possible, then you can add sculpey to get a natural pose and a body shape specific to the custom character. I assembled the parts. I used a small screw to attach the head securely. I pushed some sculpey between her legs to widen her stance, so that she could stand on her own.
2. I usually work from the feet up. I sculpted the basic shape of the skirt. Then I sculpted one boot. I didn't do the other right away because you can sometimes mess up one sculpt when doing another close by. I wanted to boil it first.
3. The Anyanka torso doesn't have a bosom. I wanted it to show a slight cleavage, so I sculpted one breast. I didn't do the other immediately for the same reason as above. It's hard to smooth the cleavage, without squashing the breast you've just sculpted. I sculpted the other boot, and added a layer to make the final shape of the skirt. I made a criss-cross pattern on her skirt, with dots in the middle, to show the lace overlay.
Stages 4-6
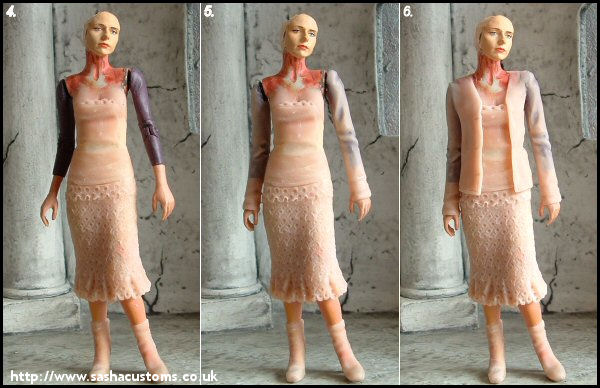
4. I finished the cleavage and sculpted the front part of her top. I made a few fabric folds and defined the lace at the top and bottom. The lace at the bottom goes all the way round. It was not necessary to sculpt the rest of the top as I knew it would be covered by her jacket.
5. I sculpted the sleeves of the jacket next. It is much easier to do this while there is still articulation in the shoulders, so that you can swing the arms up and get at them from all angles.
6. I moved the arms up so that I could sculpt the jacket all the way round, and shape it. Once this was correct, I moved the arms down. The arms were flapping out a bit to far, so I held them to her sides and pushed a bit of plastic into the tops of the shoulder joints. This kept them in a more natural pose. I then filled out the rest of the shoulder joints with sculpey and boiled again to set.
Stages 7-10
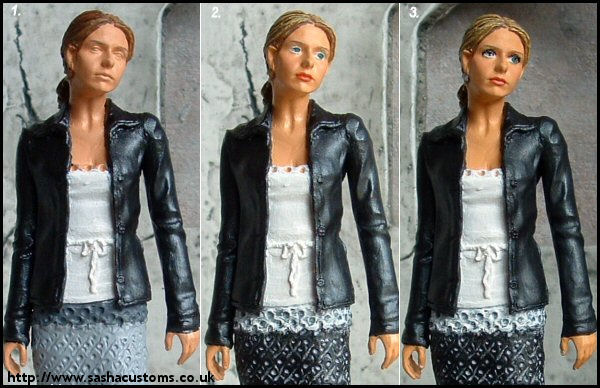
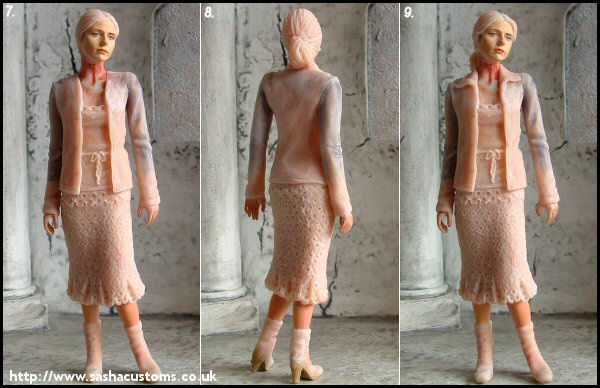
7. I added some sculpey above the neck, to smooth the join to the head, and sculpted her tied-back hair. I built up the top of the jacket a little, and added the bow at her waist.
8. I sculpted the collar and the loose bun at the back of her head.
9. I sculpted her ears, earrings, and added another tendril of hair to her forehead. Then I sculpted the buttons on her jacket. It's best to add buttons last, as delicate items can get knocked off by accident, if they are sculpted too early.
Feel free to ask any questions here.
Rest-in-Peace Buffy
Reference & Parts
I used the OMWF Buffy head, Anyanka body and Willow arms.
Stages 1-3
1. I trimmed the jawline of the Buffy head so that it would work better with a hair-pulled back style. I trimmed down the stomach, hip and knee on the Anyanka figure. This is not because she is fat (far from it) just that I wanted to change the posture. Anyanka is arching her back, and pushing out her stomach and also jutting one hip. The knee goes quite far forward. I wanted Buffy to be in a more casual pose. I find it is best to start with as skinny a base figure as possible, then you can add sculpey to get a natural pose and a body shape specific to the custom character. I assembled the parts. I used a small screw to attach the head securely. I pushed some sculpey between her legs to widen her stance, so that she could stand on her own.
2. I usually work from the feet up. I sculpted the basic shape of the skirt. Then I sculpted one boot. I didn't do the other right away because you can sometimes mess up one sculpt when doing another close by. I wanted to boil it first.
3. The Anyanka torso doesn't have a bosom. I wanted it to show a slight cleavage, so I sculpted one breast. I didn't do the other immediately for the same reason as above. It's hard to smooth the cleavage, without squashing the breast you've just sculpted. I sculpted the other boot, and added a layer to make the final shape of the skirt. I made a criss-cross pattern on her skirt, with dots in the middle, to show the lace overlay.
Stages 4-6
4. I finished the cleavage and sculpted the front part of her top. I made a few fabric folds and defined the lace at the top and bottom. The lace at the bottom goes all the way round. It was not necessary to sculpt the rest of the top as I knew it would be covered by her jacket.
5. I sculpted the sleeves of the jacket next. It is much easier to do this while there is still articulation in the shoulders, so that you can swing the arms up and get at them from all angles.
6. I moved the arms up so that I could sculpt the jacket all the way round, and shape it. Once this was correct, I moved the arms down. The arms were flapping out a bit to far, so I held them to her sides and pushed a bit of plastic into the tops of the shoulder joints. This kept them in a more natural pose. I then filled out the rest of the shoulder joints with sculpey and boiled again to set.
Stages 7-10
7. I added some sculpey above the neck, to smooth the join to the head, and sculpted her tied-back hair. I built up the top of the jacket a little, and added the bow at her waist.
8. I sculpted the collar and the loose bun at the back of her head.
9. I sculpted her ears, earrings, and added another tendril of hair to her forehead. Then I sculpted the buttons on her jacket. It's best to add buttons last, as delicate items can get knocked off by accident, if they are sculpted too early.
Feel free to ask any questions here.